


 LIMITED TIME
Last Sale Of The Year!
Up to 20% off at checkout on the YoraHome Store.
Grab All The Yoras You Want!
Carving Machines
15% off Yora 3018-Pro Machine
15% off Yora 3018-Pro Accessories
$100 off Yora SilverBack Machine
8% off Yora SilverBack Accessories
15% off Yora Router Bits
Laser Engravers
15% off Yora 6550 Machine
15% off Yora 6550 Accessories
15% off Yora Mini Laser Engraver
15% off Yora Draw
$200 off Yora CO2 Laser Engravers
$200 off Yora Fiber Laser Engravers
3D Printers
$10 off Yora Ender-3 V2
$30 off Yora CR-6 SE
$40 off Yora Ender-5 Pro
→Each printer comes with 3x Free bonus items
3D Filaments And Accessories
20% off Yora PLA Filaments
15% off Yora 3D Printers Accessories
1x Free Yora Filament Dryer For 1x 3D Printer + 5x PLA Filaments or 10x PLA Filaments
Woodworking Tools: 20% off
Home And Office Accessories: 20% off
Get Amazing Free Items With The Gorilla Bundles!
#1: 1x Free Yora 3018 Essential Bits For 1x Yora 3018 + 1x Yora 6550
#2: 1x Free Yora Rotate Module For 1x Yora 6550 + 1x Yora Draw
#3: 1x Free Yora Filament Dryer For 1x Yora 6550 + 1x 3D Printer
#4: 1x Free Yora TLC Rotary For 1x Yora 3018 + 1x Yora 6550 + 1x Yora Draw
#5: 1x Free Yora 6550 Z-Axis, Drag Chain, Air Assist and 3D Led Lamp For 1x Yora 3018 + 1x Yora 6550 + 1x Yora 3D Printer
Terms Apply
10 Things You Need to Know About Using the YoraHome 6550

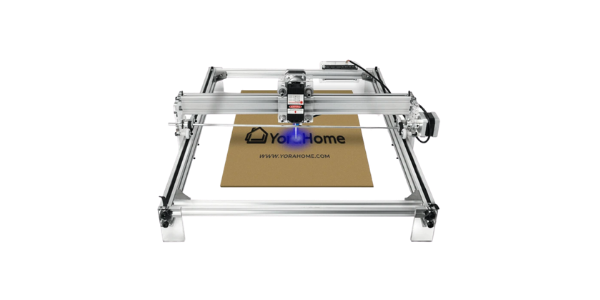
Perhaps you already have a YoraHome 3018 and you’re considering buying a specific laser engraving machine, rather than adding a laser to it, or you’re ready to jump straight into the world of CNC with the YoraHome CNC Laser Engraving Machine 6550.
Well, here are a few pointers and things you need to know to get the best out of the YoraHome 6550.
1. Build up the YoraHome 6550 properly
This will sound familiar if you have read the 10 Things You Need to Know About Using the YoraHome 3018.
That may sound obvious but use our instruction manual, and you will find it so much easier to build up your machine.

This is the version you will receive on the USB stick that gets delivered with your machine.
It will guide you step by step and get your machine and the software all set for your first projects.
Note you will use different software for the laser than you would for carving.
You only have 2 axes to be concerned with, left and right & front and back – there is no up and down on the 6550.
Make sure everything is moving smoothly and the software is connected and moving the two axes appropriately.
Read the instructions very carefully and adjust the belts as necessary to allow smooth movement.
Check the corners of the machine are at 90 degrees – voice of experience, it won’t run smoothly if the angles are not set up correctly.
2. Prepare a setup
This is a big machine, to para-phrase Jaws “We’re going to need a bigger table”.
65 cm by 50 cm (6550 makes sense now) is the working area, you then need to account for your laptop or computer that you’re going to use with it.
Excuse the mess but this is my set up:

You will also see that there is no “base” to this machine, you have no spoil board fitted, so if the laser burns through your project, you could be damaging the surface underneath.
Do not place the machine directly on top of your antique dining table. You have been warned!
Some people have been very industrious and built foldaway tables for their machines, so they can put them out of the way when not in use.
3. Protect your eyes
Before you even turn the machine on, you must account for safety. As much fun as laser engraving & cutting is, safety must come first.
You need to wear appropriate eye protection to avoid serious & permanent damage to your eyesight.
NEVER LOOK DIRECTLY INTO ANY LASER BEAM.
With the YoraHome 6550, you will be sent a pair of Blue-Violet Laser Protective Glasses 200-540nm.
You can get extra glasses for friends and family to admire your work while you’re busy.

4. Set correctly the distance between your laser and your material
There is a guide distance for using the laser to get the optimum performance from it – it’s normally around 1 ¾ inches / 45 mm.
But, to achieve that distance from the lens, you may need to use some scrap boards to raise your item up, or get yourself a YoraHome Mini Aluminium Alloy Lifting Platform.

This is the ideal way to adjust the height position of the object you want to laser engrave, rather than shuffling bits of board and scrap wood like a deck of cards to get the right height.
5. Focus
Probably the most important thing to get right to get a decent burn from your machine.

Once you have got your material to the approximate ideal distance, you then need to adjust the focus of the lens to achieve the smallest dot you can.
You will need to set up shortcuts in LaserGRBL (or Custom Buttons) so that you can turn the laser on and off and use low power while focusing.
You will find that you will “go past” the smallest and it will start getting bigger again, so just adjust until you feel you’ve reached the smallest you can.
6. Install the Custom Buttons (if you are using LaserGRBL)
This sounds much more complicated than it actually is.
When you open LaserGRBL, which is the the laser burning software suggested for Windows users, you can add shortcuts or custom buttons to set up your projects and make your life much easier.
For example, you will want an “on/off” button with low power so you can focus the laser.

The LaserGRBL website has some great video tutorials and instructions on custom buttons for on / off, tracing the frame of the image etc. etc. In fact, they have even created a set of useful shortcuts you can download!
7. Choose your material carefully
Certain materials such as PVC can emit noxious gases, others can catch fire very easily.

But, don’t think this is going to limit you! You can use a huge variety of materials, from slate to glass, paper to leather and so on and on.
You are going to find yourself looking around your house at anything that is not alive or not bolted down and wondering “Ooh what would that look like lasered”, from wine glasses to phone covers, nothing will be safe.
8. Choose your image carefully
LaserGRBL will let you import bmp, jpg, png and gif file format as well as Gcode.
You can use photographs, diagrams. When you want to use text, you’ll need to save it as a picture first. Or, you can use LightBurn Software (comes with a 30 day free trial), as this software has various additions and options not available in LaserGRBL.
Just try things out, see what works well and what doesn’t work straight away, just keep tweaking till you get the result you’re after.
The picture below was today’s trials on Perspex, the third attempt in the middle is what I’ve settled on now, after adjusting speed and power to get my desired result on what was a bmp image. I’ll be cutting this out and slotting it into an LED light base – as it was a large piece of Perspex it had bowed a little, hence my other half’s hands in the pic.

9. Take Notes
Take notes of each job you start, successful or not so successful, material you used, the sort of image used, bmp, gif, etc. work size and all of your settings, not just speed and power.

Make a note of whether you used line to line, vectorize, dither or centre line - did you use fill, if so, horizontal, vertical or diagonal, how many lines per mm and speed of engraving, everything.
If you want to be extra organized, take photographs of the finished article, print it, and stick it into your notes.
Try to keep a notebook at the side of your machine and try to note something every time you use the machine.
You may want to do something similar in the future and it’s great to be able to look at what you’ve done previously to give you an idea of where to start.
10. Practice!
Unless you are very lucky or a born genius, getting to grips with the YoraHome CNC Laser Engraving Machine 6550 is going to take practice.
Some people just seem to turn it on and are able to produce amazing results without any issues – not me, as you can see from Point 8.

You can arrange a free 1 hour coaching session when you’ve got your machine with our technical team by contacting support@yorahome.com and they will get you going.
Just remember if something doesn’t work the first time, you were only practicing and learning.
The time is now, get yourself a YoraHome 6550 and join the Yora family. You’ll be producing items you thought would be beyond you, in no time at all.
You may even start up a business, lots of YoraHome customers have, you will only wonder why you didn’t get one earlier!


Get The Freshest Content
Straight To Your Inbox
Join over 3,000 creators who receive premium content, exclusive discounts, and all the must-know info on a weekly basis.