How To Laser Engrave A Silicone Wrist Wear (With A Diode Laser)

These days it seems everyone wears some kind of silicone band on their wrist – Help for Heroes, Medical Alerts or as I saw on a young girl yesterday BFF and yes, her best friend had one to match.
Along with silicone wristbands, the popularity of Fitness Trackers and Apple Watches and so on means that silicone seems to be the weapon of choice for wearing on the wrist.
This article will cover how I tried to use the YoraHome 6550 with a 40w diode laser to personalize silicone wristbands and watch straps. It will explain the process and tips on how to achieve the best results.
1. Stand Out from The Crowd
So, to make ones that stand out from the crowd of baby pink or tartan or stripes, I wondered if I could personalize them using my 6550 with a 40W laser.
Someone had asked if I could do a watch strap with a cut in design – never afraid of a challenge I thought I’d give it a try.
2. Acquisition
First stop, acquire silicone wristbands and watch straps, these are easy to find on-line and reasonably priced. Once they arrived, it was going to be plain sailing – ha, not so fast.
3. Testing
Setting up the bands to test, I found that they fit perfectly around a 10 cm coaster.

One band however makes it unstable, 3 seems to work well.

Silicone is very pliable and squishy in the band form, so in trying to get them to lie straight under the laser. I found that drawing a square of 10 x 10 cm on my spoil board using Lightburn, meant I would put the coaster with attached bands dead straight.

This square requires some work, use Offset Shape.

You want the square to be visible to place the coaster.

Notice I said coaster, to get the bands exactly straight I put the coaster in place on the spoil board and drew 2 lines in Lightburn across the coaster, very slightly larger than the width of my bands, now I could be sure everything was lined up and ready to try.

What I wanted was some kind of flowery design, like you see around borders of things.

Having picked the one to use, I loaded it into Lightburn.

This would be much bigger than the band itself, so I needed to adjust the size.

Now time to set speed and power, to begin I thought I’d be quite conservative and tried 300 mm/min at 50% power.

No picture to show, as it did nothing!
Slight light bulb moment when it dawned on me, I was trying to use an image – not the easiest to start with, what I needed was a line drawn vector image.

In Lightburn (zoomed in).

And thinking to heck with conservative let’s push the boat out a bit – 100 mm/min 90 % power.

Oooh, all charred white, aha, quick soapy rinse, needs a better clean and its not exactly tra daaa, but definitely progress.

So that was on a red band, what about other colours, would they work …….
Bright Green – yes
Orange – yes
Navy Blue – no
Purple – no
Oh disaster, for now anyway.
4. Silicone Watch Band Testing
So moving on to watch straps before I got too disheartened, I tried a pinkish one, using the same settings as I had on the bands, then baby blue and got the same result – zip, nada, nothing. Hmmmm, needed to try something else so I went back to the bands and tried a black one.

Now that’s more like it, then a quick soapy wash.

So, black worked really well.
I just happened to have some black spray on removable paint, so it had to be worth a try.
Quick light spray of black onto a baby blue and a pale green strap.

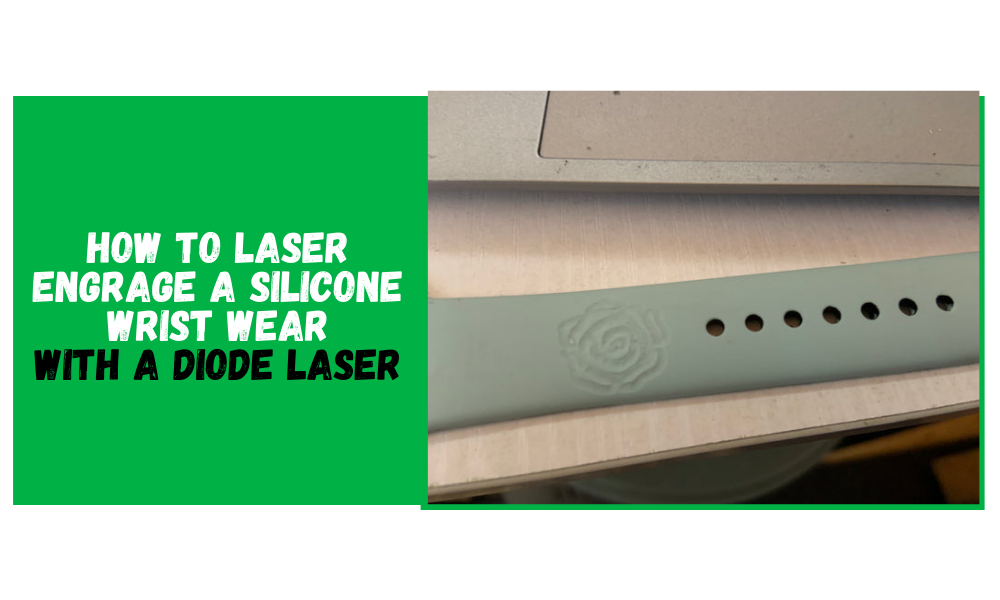
Set up under the laser again as before and the result wasn't too bad.

On removing the paint (with my fingers) it looked grubby, but it was definitely starting to show promise.

After a proper clean with a tiny bit of Isopropanol.

Now that’s what I’m talking about!
5. Conclusion
Can you engrave silicone bands and watch straps with YoraHome machines? Too right you can! Just another thing you can do with these incredible machines.
I'm sure that with a CO2 laser I can get a much finer line, can't wait for my CO2 Laser Engraver to arrive so I can try that out as well.
Get The Freshest Content
Straight To Your Inbox
Join over 3,000 creators who receive premium content, exclusive discounts, and all the must-know info on a weekly basis.


