How To Burn Images on Scratch Paper or Cards

Who didn’t love scratch paper when they were little? Even the least artistically blessed could be proud of the colorful scratches they made on pieces of black card.

Well, if you haven’t seen photographs of it done yet, you can get great results using your laser on scratch card or paper and the YoraHome CNC Laser Engraving Machine 6550 is the ideal machine with its laser to try this out.

Go raid your kids or grandkids' craft boxes if they have them or splash out and get a huge pack for about $30 / 20 GBP.
This article is going to look at testing grids, using the array function in LightBurn, burn tests on scratch paper, burning an image on scratch paper and cleaning the image for display.
Laser Testing Grids
First of all I’ll be completely honest here, since I’ve had my laser, I have repeatedly looked at “Test Grids” being used and I just didn’t get it I’m afraid, I am blonde admittedly but I’ve got to grips with most things but these grids just looked so complicated and I couldn’t seem to find an explanation of what they were supposed to achieve and how.


So, it was time to pull it apart and see what it really does. It appeared that on most of the ones I looked at, the bottom left-hand square related to one speed and power, the next along the same speed and a lesser power and so on, so why had I found this complicated? There was a bit of a lightbulb moment when I realised that each box would need to be assigned a different colour in Lightburn to signify each different setting (i.e., layer). Running a test like this would mean that you could have a maximum of 29 different settings of speed and power – aha easy really. So, I drew up my own version of a test as below:

It shows the different “layers” on the Cuts/Layers box on the right-hand side to match with all the boxes on the work area.
But what if you needed to test more settings at the same time, can it be done? Yes, it can!
Using the Array Function in Lightburn
Draw a square with the rectangle tool on the left of the workspace. Adjust the size to 15 mm x 15 mm.

Click on Create an Array.

This opens the Create Grid Array box, change the X columns to the number of power settings needed to test. I used 9.

Click on the first box and set the speed and power. I started with 1500 mm/min for speed – I’ve worked with paper before and almost had a little fire, be careful, do not use high power and slow speeds on flammable materials such as card or paper! First box 1500 speed 100% power.
(Please note that it is not advisable to run the laser at more than 80% without running a risk of shortening its working lifespan and so on. I take full responsibility for what I put my own machines through during testing).

Open Window and click on Shape Properties to add the Shape Properties box on the right-hand side.

Now click on the second box and with the Shape Properties box open, adjust the Power Scale to 90%.

Moving along, do the same process to the next box 80%.

Until you get to the last box at 20%.

Next select all of these boxes and set the colour (layer) – notice the Power Scale now says Multi.

Select all of the row and click on the Array Function again.

Adjust the number of Y rows to the number of different speeds you want to test – I wanted 5.

Select each row separately and assign a colour to each row.

Label the rows with the speeds, I used 1500, 2000, 2500, 3000 and 3500 mm/min and % you’re going to use.

Select each row in turn and via the Cuts / Layers box adjust to the speed alongside it.

You can now check each box in the Shape Properties and you will see each has its own specific speed and power level.

Burn Tests on Scratch Paper
Then its just a case of setting up the laser and scratch paper and setting the focus.

Next let the machine do its thing.
Quick note – go into Cut Settings and click Fill Shapes individually, to complete each square one at a time – this does make things a bit quicker as I’m well known for my patience.

When the burn finishes,

It all looks a bit charred, using a microfibre cloth, gently wipe in one direction then the other and it all comes to life.
 >
>
You can see easily that the first few boxes at 1500 mm/min starting at 100% power, burnt through the card completely.

As the speed increased the burn became less and the desired effect to me looked like it would be around 2750 mm/min at 90% power.

Burning an Image on Scratch Paper
I replaced the scratch paper, imported an image into Lightburn, set my speed and power.

And away it went, again not so impressive when it finished.

Cleaning the Scratch Paper after Burning
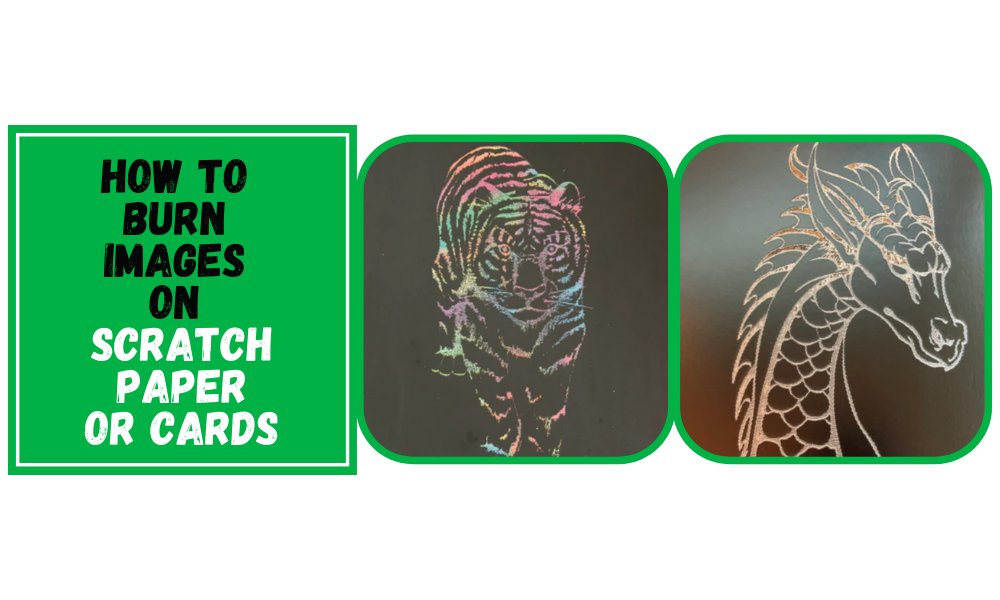
But once cleaned, what a difference! After the microfibre wipe, a very gentle go over with a baby wipe will really get the colours jumping.

And just because some came in the pack of card that I’d got, I decided to try using the card with a gold backing.

Wow, how fabulous is that?
And just for Jim Rarey, on a silver backing.

Is there anything you can’t try out with a YoraHome machine? Every time I try something new I love it more and more.
The Yora 6550 will provide you with hours of entertainment and may even become a new income stream for you, or even a new career path.
Join the growing number of YoraHome machine owners and see what all the fuss is about, you'll be so happy you did.
Get The Freshest Content
Straight To Your Inbox
Join over 3,000 creators who receive premium content, exclusive discounts, and all the must-know info on a weekly basis.


