The Yora Offline Controller Just Saved My Life!

I may have mentioned in previous articles that we live in a small house, and my love of the toys puts quite a strain on the amount of space available and particularly on my other half, Shaun as he uses the same room I do for my stuff as he does for his small business, buying, selling and repairing radio controlled cars.
So, when the Yora 3018-Pro Expansion Kit became available, either I needed to get rid of something – (not Shaun), build an extension on the house or find a way to reduce space taken up by each machine and associated computer tech.

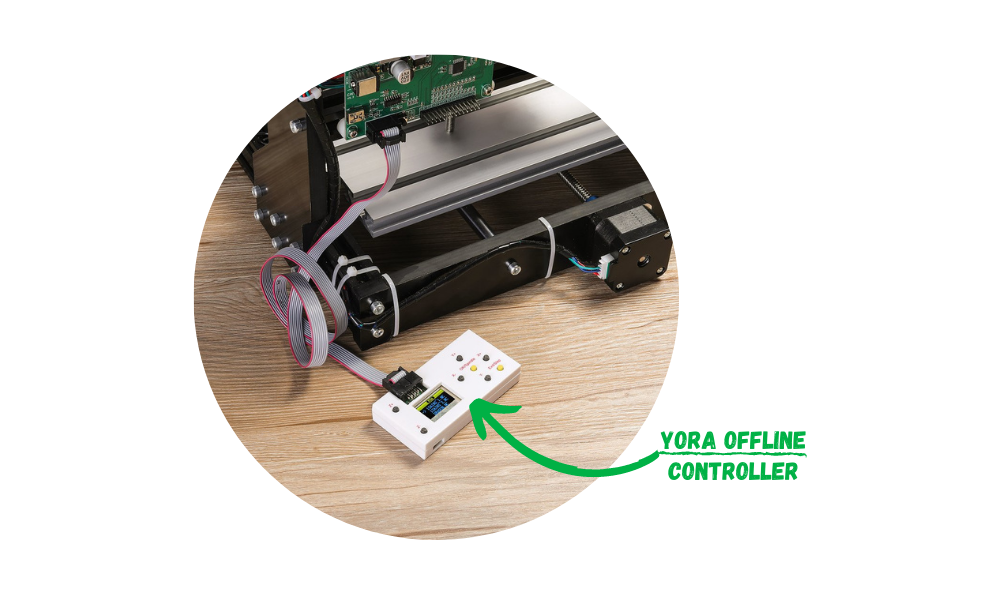
Well, why I hadn’t tried it before, I don’t know but there was an obvious answer: the Yora Offline Controller.

This would remove the necessity to have the laptop connected to the machine and save me lots of space, or generate enough room for the expansion kit. Same, same but different, as I was frequently told while working in Egypt for 10 years by local workmen who had done various things including running the washing machine pipes straight across the kitchen at waist height, rather than extend them to go around the wall.......I digress.
This looks much more complicated than it is. It just takes a lot of words to describe and I do like to talk if you hadn’t realized already.
So, first things first, I wanted to have an example to check against, so I could see that the controller would actually do what I wanted. So back to basics first, open LaserGRBL and import my favourite file for trials:

Setting the size small would mean it wouldn’t take too long to do and I could move on to the next bit.

Press Create:

Next set power & speed:

Once the scrap piece of bamboo board I was going to use was in place and I’d set the start point and focused my laser, it was ready to go.

I’m happy to report that despite having spent most of the last couple of months using my Yora 40W CO2 Laser Engraver, I hadn’t forgotten how my beloved Yora CNC Carving & Laser Engraving Machine 3018-Pro works and within 10 minutes I’d got my "original sample".

Then, time to get to grips with the Offline Controller, how hard could this be?
Using the USB cable that normally connects to the control board, I connected to the controller.

On the display, it shows the connection has been made.
Back in LaserGRBL, click on File and Save (Advanced Options):

This will open another box where you need to click on "Save":

Make sure you save the Gcode file to the USB Drive.

Disconnect the USB cable from the Yora Offline Controller and move the laptop out of the way!
Connect the controller cable to the front if not already in place and the other end of the cable to the Yora CNC Carving & Laser Engraving Machine 3018-Pro control board.

The controller will now be displaying its Menus- as below:
Ctrl – Control
File - File
By using the Y buttons, you can move up and down the 2 options.

Once CTRL is selected. Click OK, this will open the Control Menu.

Through pressing the X and Y buttons, you can move the laser around to your required start point.
Clicking the Exit/Step button will adjust the step size, 0.1, 1, 5 or 10 mm, and with the Z button, adjust the height to the correct position to set the focus.
Press the Exit/Stop button again to return to main menu. Select File, this will open your files and with the Y – button you can move down the list to find your file.

Click OK/Spindle again and you will see the Ready to Print screen, click yellow OK button again.

The machine will start and reproduce the image exactly as it would normally.

Just look how much room I’ve made! And I’ve already found a file to 3D print a controller holder that attaches to the side with my Yora Creality Ender-3 V2 3D Printer to save even more.

And by the way, this is the side by side comparison of the laser etches, I know which is which, but you really could not tell if you didn’t.

This little piece of kit will now let me have a bit of extra room to fit the Yora 3018 Expansion Kit without Shaun and I having to build an extension – for now anyway.
And in case it wasn’t obvious, the Yora Offline Controller can be used with the Yora CNC Carving Machine 3018-Pro for carving as well.
Well, when using the 3018 with the spindle, my weapon of choice is Easel.
This is how I use it with the Offline Controller. You set up your design, material size & type, cut depth, bit size, cut settings:

Click on Machine and then on Advanced:

This will open the Advanced Settings, check Spindle Control is set to Automatic and Default RPM set to 9000, then click Generate g-code. Once completed, click Export g-code:

Now this is where Easel gets awkward. All the other software you’re likely to use converts the g-code ready for you. Easel not quite, but it’s not that complicated to make it work, I promise.
Depending on the version of Windows your computer uses, you may already have it, if not you need to download Notepad++, follow the link and download the current version.

When the file has installed, you will have this screen:

Click on File, then Open.

Go to your folder (for me it was "Downloads") to find the g-code file that you exported from Easel.

Open that and it will open something like this:

Don’t panic, this is the easy bit. Next, look to the bottom right and you will see Unix, right click on it and click on Windows (CR/LF). This will add all the required additional bits of code to each line.

Go to View then Show Symbol, then click on Show End of Line:

Just like that:

The last line of code will be M5, this is to turn off the spindle.

Place your cursor alongside the M5 and press enter. This will add the required symbol there as well.

Now, connect the Yora offline controller to your laptop as you would with the laser and save the Notepad++ file to the SD Drive.
Copy the file to the SD disc as I did for the LaserGRBL file, connect up the Offline Controller to your 3018, using the X and Y buttons, move your bit to the starting point and with the Z button, adjust the height to the correct position. Clicking the Exit/Step button will adjust the step size, 0.1, 1, 5 or 10 mm.
Click Exit/Stop button again to return to main menu.
Press Y – to move selection to File, click OK/Spindle.
This will then open a screen with Ready to Print – click OK.

This will start your carve!
Now you can make more room for more toys like me. Whether you to carve or laser engrave with the Yora 3018, using the Yora Offline Controller will give you some space or the possibility to run the machine offline.
It’s so hard to choose between the YoraHome machines, so why choose one when you can fit in more?
Get The Freshest Content
Straight To Your Inbox
Join over 3,000 creators who receive premium content, exclusive discounts, and all the must-know info on a weekly basis.


