All You Need To Know About The Yora Essential Bits | Overview (Part 1)

For anyone that has read any of my blog pieces previously, you will already understand that I tend to “wing it” with stuff to begin with and eventually after wasting lots of materials and time, I come back and do some proper testing to work out what I really need to do.
Well, that normally being the case when I opened the box for the Yora 3018 Expansion Kit for my Yora CNC Carving & Laser Engraving Machine 3018-Pro, I promptly decided to follow the excellent video instructions on the YoraHome CNC Users Group Facebook page!

This decision, no doubt saved me hours of frustration and wasted time. Happy with the now huge bed and having re-configured my machine in Easel, it was time to try out something properly again.
Of course me being me, now having this enormous bed to work on, I chose to use some small pieces of birch ply that I’d found and thought would make good test pieces.
But, being shall we say a little “ham-fisted” when it comes to using the clamps to attach pieces to the bed, I thought I’d make some adaptations, nothing massive, just a small nut block to hold the clamp better in the T-Rail.
The Creality Ender-3 V2 3D Printer is ideal for making pieces like this and so many other things.

These aren’t a necessity, but they do make securing pieces easier.
Opening Easel and a New Project, I set my material and dimensions:

Knowing that I planned to try the Yora Essential Bits,

I chose to use the original guidance I was given with the machine on using Easel, rather than using Easel Pro which I do have installed.
But, so that everyone can follow this, I used “Other” as the bit type and put in the size of the bit I intended to use – firstly the Yora CNC Shank Blue Coated Engraving Bits (V-Shape). So, I set it to 0.1 mm.

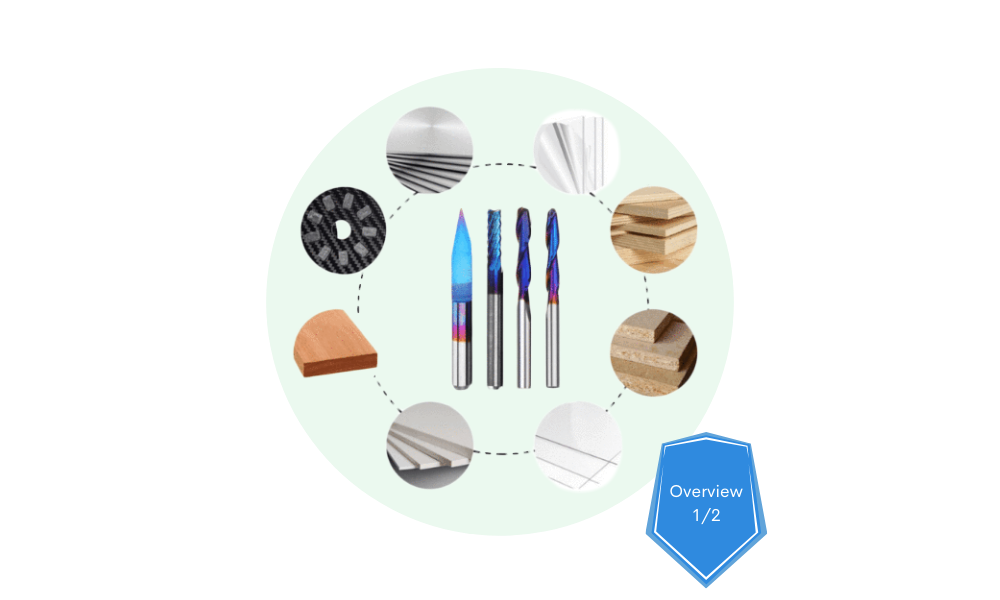
These V-Shape bits are suitable for the engraving and carving of Copper, Aluminium, Jade, Redwood, Hardwood, Acrylic, Colour Plates, PVC, MDF, PCB. etc. for detailed work, small 3d carving and engraving.

Next, I wanted to add the shapes to cut with each bit:

Using the Shapes function on the left of the page, I added a square, a circle and a triangle.

These were initially solid shapes, but using Edit and Select All, then going into Cut, I changed the depth to 2 mm and to Cut on Shape Path. 
This does almost make the design disappear on the right, but it is still there.
Next, I set the cut settings:

Again, back to absolute basics:
Feed Rate – 150
Plunge Rate – 100
Depth per Pass – 0.3
Then, I set the zero position on the machine, checking with a little piece of paper as always. And then went through the Carve set up:


Raise the bit from the surface, and take out the piece of paper, turn on the spindle, confirm the spindle is on, then “Carve”.


Birch Ply is not the absolute best material by any stretch of the imagination; however, it does give you a very good idea of what is possible with each of the bits, I also admit that a quick sand over would improve the finish enormously too.
So, next I moved onto the Yora CNC Shank Blue Coated Engraving Bits | Flat Nose, these are suitable for the engraving and carving of Copper, Aluminium, Jade, Redwood, Hardwood, Acrylic, Colour Plates, PVC, MDF, PCB, etc. for 3D relief sculpturing, cutting, engraving, slotting, milling, etc.
The cutting edge of these bits is 3.175 mm, so the only thing I changed was the “Other” bit size, 3.175 is a bit too accurate for Easel and it puts it as 3.2 mm.


This bit generated quite a lot of sawdust and left the top edge rather raggy, again a quick sand should resolve that.
Next, I tried the Yora CNC Shank Blue Coated Router Bits | Ball Nose, which are suitable for the engraving and carving of Aluminium, Copper, Jade, Redwood, Hardwood, Acrylic, Colour Plates, PVC, MDF, PCB. etc. for 3D relief sculpturing, cutting, engraving, slotting and milling.
Also being 3.175 mm, I didn’t need to change anything in Easel:


Finer sawdust and much cleaner edges with the Ball Nose!
Moving on to the Yora CNC Shank Blue Coated Engraving Bits (Corn Milling) which are suitable for PCB, SMT, CNC, Moulding, plastic fibre, carbon fibre, hard wood, printed circuit board, and other precision parts processing, also suitable for milling and cutting (PVC, PCB, acrylic).
This set comes in different sizes: 0.8, 1.0, 1.2, 1.5, 1.6, 1.8, 2.0, 2.4, 3.0 and 3.175.
Starting with 0.8 mm, all I changed was the bit size for each. The smallest of these bits did not create too much dust but did give quite clear lines.


Then the 1.0 mm,

1.2 mm


1.5 mm


2.0 mm


2.4 mm


3.0 mm


3.175 mm


Having tried each of the bits, it became obvious that as the size of the bits increased, the sharpness of corners was being lost and with the Corn Milling bits, the top edge would require a bit of sanding.
My “Go to” bit all along has been the V-Shape bits that came with the machine, this bit seems capable on almost every surface I’ve tried, admittedly the small size does mean it can take a long time to complete a job, but it will complete.
The Flat Nose created a wide cut with smooth sides but a rough top edge.
The Ball Nose appears to have been the best to use on Birch Ply, with the wide cut and smooth top edge.
This just means that each of the other bits will be the best to use on a different material.
YoraHome offers you not only the machines, but the router bits and accessories to accomplish your artistic dreams. Just let your imagination run away with you and you and yours will love what you can achieve.
Having converted my standard 3018-Pro to a Yora 3036-Pro CNC router, I intend to try all sorts of new things and hopefully it won’t be too long until the Yora SilverBack 6060 CNC machine is available with its 60 x 60 cm bed. And then, who knows what we will all be able to make!
But first things first, I will be trying out using a roughing bit and a smoothing bit on my next piece, watch this space!
Get The Freshest Content
Straight To Your Inbox
Join over 3,000 creators who receive premium content, exclusive discounts, and all the must-know info on a weekly basis.


