


 LIMITED TIME
Last Sale Of The Year!
Up to 20% off at checkout on the YoraHome Store.
Grab All The Yoras You Want!
Carving Machines
15% off Yora 3018-Pro Machine
15% off Yora 3018-Pro Accessories
$100 off Yora SilverBack Machine
8% off Yora SilverBack Accessories
15% off Yora Router Bits
Laser Engravers
15% off Yora 6550 Machine
15% off Yora 6550 Accessories
15% off Yora Mini Laser Engraver
15% off Yora Draw
$200 off Yora CO2 Laser Engravers
$200 off Yora Fiber Laser Engravers
3D Printers
$10 off Yora Ender-3 V2
$30 off Yora CR-6 SE
$40 off Yora Ender-5 Pro
→Each printer comes with 3x Free bonus items
3D Filaments And Accessories
20% off Yora PLA Filaments
15% off Yora 3D Printers Accessories
1x Free Yora Filament Dryer For 1x 3D Printer + 5x PLA Filaments or 10x PLA Filaments
Woodworking Tools: 20% off
Home And Office Accessories: 20% off
Get Amazing Free Items With The Gorilla Bundles!
#1: 1x Free Yora 3018 Essential Bits For 1x Yora 3018 + 1x Yora 6550
#2: 1x Free Yora Rotate Module For 1x Yora 6550 + 1x Yora Draw
#3: 1x Free Yora Filament Dryer For 1x Yora 6550 + 1x 3D Printer
#4: 1x Free Yora TLC Rotary For 1x Yora 3018 + 1x Yora 6550 + 1x Yora Draw
#5: 1x Free Yora 6550 Z-Axis, Drag Chain, Air Assist and 3D Led Lamp For 1x Yora 3018 + 1x Yora 6550 + 1x Yora 3D Printer
Terms Apply
10 Things You Need to Know About Using the YoraHome 3018-Pro

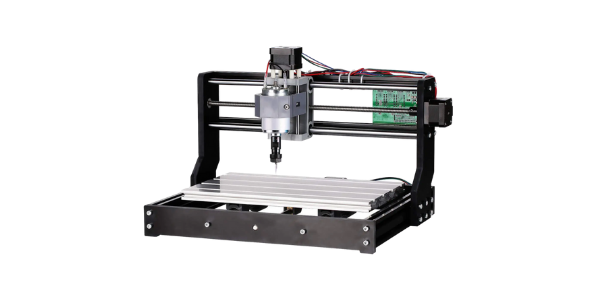
If you’re considering buying a CNC Router or you’ve bought one and you’re looking at the box and thinking “Now what?”, here are a few pointers and things you need to know to get the best out of your YoraHome CNC Carving Machine 3018-Pro.
1. Build up the 3018-Pro properly
That may sound obvious but use the correct instructions manual and you will find it so much easier.
Our version of the manual which is available after your purchase in your package, will guide you step by step, and get your 3018-Pro and the software all set for your first projects.

Make sure everything is moving smoothly and the software is connected and moving the axes appropriately.
2. Clamp your materials down
Again, it might sound obvious but there is nothing more disappointing than getting towards the end of a long carve to find that your piece has moved and ruined the whole thing (believe me, this is the voice of experience).
The clamps that get sent with your 3018-Pro really do work well when you attach them properly (yes, voice of experience again, tried slotting both bolts in table channel – doesn’t work brilliantly).

Use all 4 clamps when you can fit them around your piece of material on the table and ensure they are tightened down. Be careful if it’s a soft wood that you don’t mark the wood.
3. Use the correct bits for the material and depth you want
The bits sent with the 3018-Pro are for fine engraving to shallow depths. Don’t try to carve more than a couple of mm depth with them.
If you want to expand your capabilities, the YoraHome Essential CNC Router Bits set is the way to go.

The package includes 4 boxes of 10 CNC router bits that will satisfy your different CNC needs:
- 10Pcs Nano Blue Coat CNC V-Shape Bits (20 Degree)
- 10Pcs Nano Blue Coat CNC Corn Milling Bits (0.8-3.1mm Set)
- 10Pcs Nano Blue Coat 2 Flute Flat Nose CNC Router Bits
- 10Pcs Nano Blue Coat 2 Flute Ball Nose CNC Router Bits
With all these choices, you can work with acrylics, plastics, carbon fibre, chipboard, MDF, PCB, solid surface, wood, and aluminium. When attaching the bit, ensure you put the bit well into the collet.
4. Use scrap material to start with
Don’t spend lots of money on beautiful woods, to only find you haven’t got your depth settings right, your bit size was incorrect or your start point not in the correct place.

Most home improvement stores have a scrap wood bin with small pieces in, for very little cost, or any bits you have lying around in the garage or the shed are all good for practice.
If your practice piece turns out better than expected – its not a practice piece!
5. Use mm
This one might not be popular with everyone but get used to using mm not inches – it's just easier, I promise.
Page 48 in our User Manual has a printable ruler in mm for you to use to start with, if you don’t normally use mm. Set Easel to mm and measure your material in mm.

6. Open Easel and start a new project
Set your Material Type & Dimensions.

Pick a design with clear sharp lines, no shading, just black and white.
In Easel, use "Import", the bottom left hand button, click "Image Trace", then "Upload File", click "Select Files to Upload", find the file on your computer then click Upload.
Adjust the "Threshold" and "Smoothing" to achieve the “best” version of the image, once you are happy with it, click Import. This will place your image on the material in the bottom left hand corner. If it is made up of separate areas, click Edit and then Combine.

Click on "Shape", to keep the original proportions, click on the lock icon and set the size you want for the actual design (not the material size).
To centre your image on the material, go to the menu, click "Edit" and "Center to Material". Next. click on "Cut" to set the depth of the carve – remember with the bits that arrive with the machine you only want to be cutting to a couple of mm maximum.

Next step, is to adjust the cut settings. When you open the automatic settings, the feed rate, plunge rate and depth per pass is set for a different machine.

You need to click on Manual and adjust the settings, slow it down, reduce the plunge and reduce the depth per pass. Set the bit size – End Mills, Other and enter size as 0.1 mm.

7. Set the start point
The machine will engrave exactly where you have it on the material as shown in the right-hand panel on screen.
Jog the machine using the jog controls to your start point – bottom left hand corner.
Take a small piece of paper and put it under the bit and lower very gradually. Trying to pull the paper out, when it starts to “drag”, you are at the correct position.

Now you press the "Carve" button and go through each of the screens. On reaching Raise the Bit, you can remove your piece of paper, continue, then press "Carve" and let it do its thing!
8. Adjust your speed
Once the carving has started, you can adjust the speed up and down as needed by changing the feed rate.

A very wise man once said to me, if the dust being made by the machine is more than talcum powder, the machine is going too fast, slow it down.

9. Don’t be impatient
You will see the approximate time expected for the job to complete, it will be worth the wait.
As the close shows, MDF isn’t the best material in the world, but from a distance it looks great. This took 26 minutes.

10. Get ready for the mass of opportunities
The YoraHome 3018-Pro can offer different bits and different materials to try. You will have plenty to do, you might even turn this new hobby into a business for yourself.
You can even upgrade and get a YoraHome Laser Module as well.

So, what are you waiting for? Time to jump in and get started, buy it, build it, love it!
The YoraHome CNC Carving Machine 3018 is the best decision you will make. If you haven’t made the purchase yet, do it now, your only regret might be not getting one sooner.


Get The Freshest Content
Straight To Your Inbox
Join over 3,000 creators who receive premium content, exclusive discounts, and all the must-know info on a weekly basis.