


 LIMITED TIME
Last Sale Of The Year!
Up to 20% off at checkout on the YoraHome Store.
Grab All The Yoras You Want!
Carving Machines
15% off Yora 3018-Pro Machine
15% off Yora 3018-Pro Accessories
$100 off Yora SilverBack Machine
8% off Yora SilverBack Accessories
15% off Yora Router Bits
Laser Engravers
15% off Yora 6550 Machine
15% off Yora 6550 Accessories
15% off Yora Mini Laser Engraver
15% off Yora Draw
$200 off Yora CO2 Laser Engravers
$200 off Yora Fiber Laser Engravers
3D Printers
$10 off Yora Ender-3 V2
$30 off Yora CR-6 SE
$40 off Yora Ender-5 Pro
→Each printer comes with 3x Free bonus items
3D Filaments And Accessories
20% off Yora PLA Filaments
15% off Yora 3D Printers Accessories
1x Free Yora Filament Dryer For 1x 3D Printer + 5x PLA Filaments or 10x PLA Filaments
Woodworking Tools: 20% off
Home And Office Accessories: 20% off
Get Amazing Free Items With The Gorilla Bundles!
#1: 1x Free Yora 3018 Essential Bits For 1x Yora 3018 + 1x Yora 6550
#2: 1x Free Yora Rotate Module For 1x Yora 6550 + 1x Yora Draw
#3: 1x Free Yora Filament Dryer For 1x Yora 6550 + 1x 3D Printer
#4: 1x Free Yora TLC Rotary For 1x Yora 3018 + 1x Yora 6550 + 1x Yora Draw
#5: 1x Free Yora 6550 Z-Axis, Drag Chain, Air Assist and 3D Led Lamp For 1x Yora 3018 + 1x Yora 6550 + 1x Yora 3D Printer
Terms Apply
3D Carving Demystified!

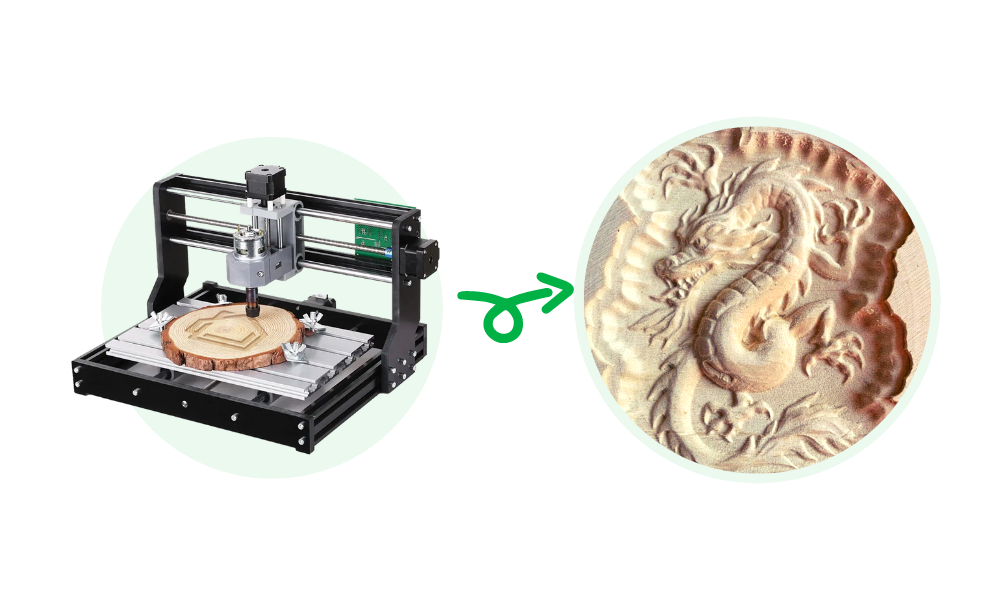
I’ll be honest here, 3D Carving has both fascinated and terrified me all at the same time. But, having already tried roughing and detailing to produce the dragon head, I won’t say I was confident enough but eager as ever to try something else new, time to try it out at least!
And before the purists tell me that 3D requires carving from all directions, front and back, I do understand that, however, this is as close to 3D as most of us will get.
First things first, you need for 3D carving is a machine capable of doing what you want, the answer to your prayers - the YoraHome CNC Carving Machine 3018-Pro.
And if you want to scale up you can with the YoraHome 3018 Expansion Kit. With the expansion kit, you have an engraving area of 30 x 36 cm (12 x 14 inches), and an effective engraving depth of up to 4.5 cm (1.8").
Next, you need the router bits. The YoraHome Router Bits selection offers a wide variety of bits suitable for 3D carving and there are more on the way (I’ve tried out some new ones, they will be available very soon).
Then, there is the software to generate your 3D model. Hmmm, well there are lots of different options available and a lot have eye-watering prices to go with them. But, and this is a massive but, they virtually all have a trial version available for free. This is the route I would advise to try and see which you like and see what you personally find easiest to use that can do what you’d like to do – believe me, some of these programs have so many features within them that they are intimidating just to look at. Just concentrate on the bits you want to try out first and sign up for that trial.
A few options include:
There are lots more, but these were the ones I tried out – ok, I looked at the websites and tried to understand how they worked, some were easier than others to follow, some had more "Tutorials" available on how to use the products, some just had too few of the actual options available on the free trial. Obviously, the free trials are available to give you a taste of what the software can do, but they won’t give away all the goodies for free – or why would you buy the full version?
Personally, I liked Vectric Aspire, the free trial is of the Vectric Aspire 10.5 version and has more than enough for you to try out and see how it works, it does so much more than just 3D modelling, but this piece is about that, so back to it.

When you open Aspire there is a link straight to the Tutorials that you can follow along and replicate the models available, such as signs, 3D models and so on. But, rather than just replicate one of their videos, I thought I’d do something else to show the process.
First, click on Create a new file.

This opens a new page with Job Setup:

Not being too cocky, I was starting with a Single Sided job, I then set the units to mm and set the size of my piece of wood, checked the Z Zero position and XY Datum position.

The Modelling Resolution can be changed from Standard (which is quickest) to High (3 x slower) or to Very High (7 x slower) and as you may guess I do not have the patience for that malarky on something I’ve never tried before, so I stuck with Standard.

I then chose Birch in Appearance, then clicked OK.

This opens the blank page with Drawing Options.

The Clipart Tab opens the next page.

In the Library Folders, clicking on Clipart opens the folder to view what is available.

Here I chose the Chinese Dragon and double-clicking on the image places it on the page.

To adjust the size to fit the page, click on the Modelling tab. 
This opens Modelling Tools. Click on Set Selected Objects Size.

Change the size of the image to what you need, then Close.

Click on Arrange Views button to display the 3D image alongside the clipart.

Click on Switch to Toolpath Commands.

Click on Set on Material Setup.

Confirm the material settings. You can put a small gap above the model to allow for any slight variations in the depth of the wood. You can also adjust the Rapid Z Gap above the Material (I changed it to 25 mm – this was way too excessive and did not need to be more than 10 and that is still very conservative). Once happy with the settings, click OK.

Click on 3D Roughing Toolpath.

This is where you set the bit you will use and how it will be used, first click Select in Tool.

You can choose one of the listed tools in imperial or metric sizes or add another tool. Adjust the cutting parameters as needed, remember to change the Spindle Speed to 9000, click Apply to confirm any changes and then OK.

Next, Machining Limit Boundary, I left this as the Model Boundary and put the Boundary Offset at 1.5 mm to allow some clearance around the edge of the model and put the Machining Allowance at 0.5 mm. The Roughing Strategy is left on Z level.

The only other change I suggest is to name the Toolpath including the size and type of end mill. Then click Calculate.

This shows the completed Roughing Toolpath.

You can watch a preview of the Toolpath in action by pressing Preview Visible Toolpath. Then click Close to return to Toolpath Operations. Next, click on 3D Finishing Toolpath.

Opening the Finish Machining Toolpath, you can choose the appropriate tool etc.

This time the Area Machining Strategy will be set to Raster.

Again, name the Toolpath and put the size and type of end mill. Then Calculate.

Then Close. You can see a preview of all the tool movements and how your image will start to appear by clicking on Preview all Toolpaths. Then Close.

This returns you to Toolpath Operations. Selecting the Roughing Toolpath first, then click on Save Toolpath.

Check the Post Processor is the correct one for the carving software you will use – I like Easel, so I followed the instructions on their website on how to add the Easel Post Processor and now it’s there ready to use. Click Save Toolpath and save to a file on your computer.
Click Close.

Select the Finishing Toolpath and click on Save Toolpath.

Confirm the Post Processor and click Save Toolpath.

I suggest then saving the complete file via the File Save As option.

Now, it’s just about ready to carve!
So, setting up your workpiece on the machine requires you to affix your workpiece to your spoil board that is itself fixed to the machine bed. Believe it or not, I used double-sided tape – it did give me a few nervous moments when I thought it was going to come loose, so I’d suggest something a bit more substantial in future.

Not surprisingly for anyone who has read any of my blog pieces before, for carving, I went to my favourite programme: Easel. Press Continue. Open a New Project.

Choose the material, I’d gone for Birch in Aspire, but the closest I could get in Easel was Bamboo. And set the dimensions of the workpiece.

Set the bit size, remember this is the Roughing pass so I used Other and set the size to 3.175 mm.

I used the 3.175 mm bit from the Yora CNC Titanium Coated Router Bits (10 Pcs), these bits come in sizes 0.8-3.175 mm (0.8/1.0/1.2/1.4/1.6/1.8/2.0/2.2/2.4/3.17 mm) and the large sizes are perfect for roughing out amongst other things. You can also use the one from the shank blue coated types as well.

In Cut Settings, click the Manual tab. I adjusted the settings to match what I had put in Aspire:
- Feed Rate: 600
- Plunge Rate: 150
- Depth per Pass: 0.4

Next, I needed to import the image I had saved earlier, click on Import. This opens the box with 4 options, choose G-code.

Click on Choose File Open the file where the Aspire files were saved and choose the Roughing file.

This validates the G-code file.

Once opened the display shows the toolpath movements to come.

The machine requires jogging in to place to get ready to carve.

If your workpiece is not square, you need to do a bit of extra work to set the zero, then raise the bit, move to your X/Y zero point and re-set the Z zero.

This is extremely important, make sure that you mark exactly the centre point of your zero point.
Click on Carve. This opens the G-code statement, where you need to click, I understand. Then Carve.

When you click Carve, the usual screens appear to check the material is secure. Confirm work zero. Click Use new position.

Follow the steps of raising the bit, turning on the spindle, confirming it is on. Then take a deep breath and hit Carve!

This is NOT a quick process, it takes time...

Although this is the roughing pass, so I did quicken up the speed once I could see that it wasn’t making too much mess – remember more than talcum powder type dust is too quick, so don’t get carried away. One of the reasons I like Easel so much is the ability to adjust settings “on the fly”.

Slowly, slowly, the design starts to appear.

When the roughing pass has finished, you can see the design in almost its full glory.
VERY VERY important at this stage: Do not adjust the X/Y position of the X axis. You can lift the Z-axis to change the bit, count how far you raise the bit and make a note of it!
On a previous try, I used the Yora CNC Shank Blue Coated Router Bits | Ball Nose (10 Pcs) - these bits have a 3.175 mm cutting diameter, which on an intricate design like the Chinese Dragon would be a bit too big.
So, I tried out the new Ball Nose bits that YoraHome will have available shortly in the 1 mm size.
This is where marking the centre of your zero position comes to play. To set your zero position for the finishing pass, you want to be certain that you will run over the exact same route, even a slight misalignment can ruin the piece completely. So, move the Z axis to where you finished the roughing pass. This should be directly above the mark you made right at the start. Using the jog controls, you can use the 1 mm and 0.1 mm to drop the bit onto your mark (take the measurement moved) – dead centre! Remember I went from 3.175 mm to 1 mm, so it needs to be right in the middle. Raise the bit back to where it was.
Back in Easel, click on New in File.

Re-set the material and cut settings and the bit size – 1 mm.

Cut Settings – Manual:
- Feed Rate: 600
- Plunge Rate: 150
- Depth per Pass: 0.4

Click Import. Then G-code.

Click on Choose File. Choose the finishing path file. This will validate the G-code file.

Now go through the Carve set up as previously, confirming material thickness, bit size and zero point. Raise the bit, turn it on, confirm and then Carve!

Well, this is the really exciting bit, but it can look like it is removing rather a lot more of the workpiece than you might expect.

Let it do its thing...

So, you want to see how it turned out?

As they say in where I come from in Yorkshire “That’ll do”.
A few things to say about 3D carving:
It doesn’t always come out quite as planned...

But when it does, wow!
Who could imagine that with the Yora CNC Carving Machine 3018-Pro a CNC machine at less than $300 / £210, you can produce something this good?

YoraHome not only provides the tools in their machines but the backup and customer service to ensure you can be as happy with what you can produce as I am!


Get The Freshest Content
Straight To Your Inbox
Join over 3,000 creators who receive premium content, exclusive discounts, and all the must-know info on a weekly basis.