


 LIMITED TIME
Last Sale Of The Year!
Up to 20% off at checkout on the YoraHome Store.
Grab All The Yoras You Want!
Carving Machines
15% off Yora 3018-Pro Machine
15% off Yora 3018-Pro Accessories
$100 off Yora SilverBack Machine
8% off Yora SilverBack Accessories
15% off Yora Router Bits
Laser Engravers
15% off Yora 6550 Machine
15% off Yora 6550 Accessories
15% off Yora Mini Laser Engraver
15% off Yora Draw
$200 off Yora CO2 Laser Engravers
$200 off Yora Fiber Laser Engravers
3D Printers
$10 off Yora Ender-3 V2
$30 off Yora CR-6 SE
$40 off Yora Ender-5 Pro
→Each printer comes with 3x Free bonus items
3D Filaments And Accessories
20% off Yora PLA Filaments
15% off Yora 3D Printers Accessories
1x Free Yora Filament Dryer For 1x 3D Printer + 5x PLA Filaments or 10x PLA Filaments
Woodworking Tools: 20% off
Home And Office Accessories: 20% off
Get Amazing Free Items With The Gorilla Bundles!
#1: 1x Free Yora 3018 Essential Bits For 1x Yora 3018 + 1x Yora 6550
#2: 1x Free Yora Rotate Module For 1x Yora 6550 + 1x Yora Draw
#3: 1x Free Yora Filament Dryer For 1x Yora 6550 + 1x 3D Printer
#4: 1x Free Yora TLC Rotary For 1x Yora 3018 + 1x Yora 6550 + 1x Yora Draw
#5: 1x Free Yora 6550 Z-Axis, Drag Chain, Air Assist and 3D Led Lamp For 1x Yora 3018 + 1x Yora 6550 + 1x Yora 3D Printer
Terms Apply
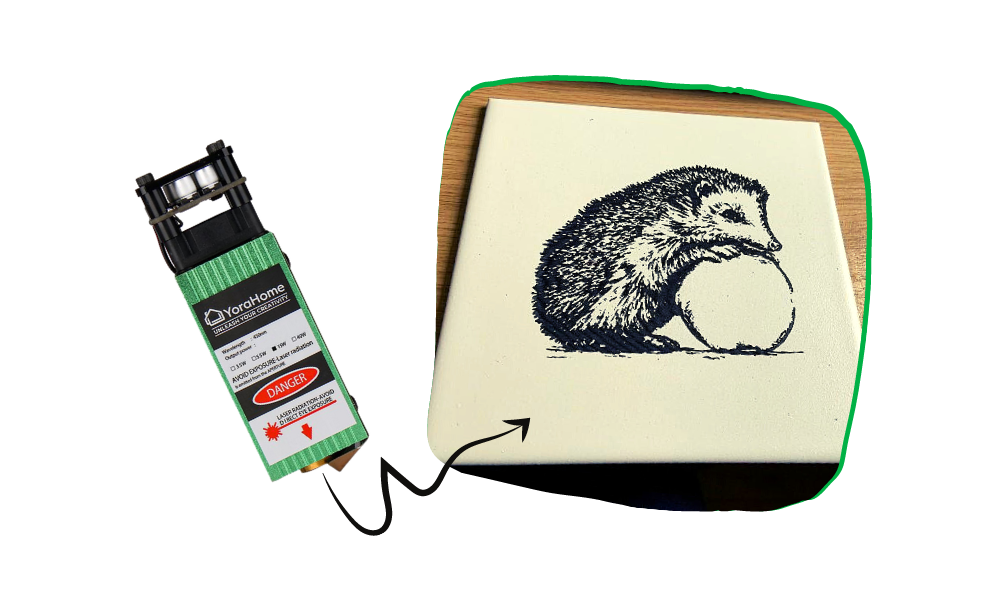
How To Laser Engrave On Tiles

Well, I will start this with an apology to all the geniuses that have been doing ceramic tiles for ages and turning out some absolutely amazing pieces!
I was jealous of what you were able to achieve and wanted to try it out myself. My methods may not match yours, but this is how I got it to work for me and hopefully, anyone else wanting to try it out can follow along with me and actually produce something they can be proud of.
I will also show you some of my mistakes and disasters along the way as I’m sure you will get as much from them as the good bits, and you can have a good chuckle at my expense.
Having enjoyed my try at 3D carving it was time to switch back to the laser on my YoraHome CNC Carving & Laser Engraving Machine 3018-Pro.

But oooh, which laser to try, well I went for the YoraHome Laser Module 40W with fixed focus.

Obviously, I have googled to death how to do tiles and so on and picked bits from various guides on what I should do.
First thing was to find some tiles. Thankfully, there is a bulk tile store nearby where I managed to get a box (44 tiles) for less than £7 / $10, result! Won’t matter too much if I mess a few up, hahahaha.
The next suggestion I read was to clean off the film that the new tiles are covered in. Amazon to the rescue, I bought 500 ml of Isopropanol – Isopropyl Alcohol and wiped over a few tiles with it using a microfibre cloth.

Once dried, which for me was overnight, not for any particular reason other than the football was on TV that night, I could paint them. Painting of any kind, especially spray painting – not my forte. When my other half Shaun had stopped laughing at the patchy, lumpy, disaster that I’d made, he went off and sprayed lightly and evenly half a dozen white tiles for me.

Having learned my lessons from jumping in feet first and trying to wing it with other projects, I took the pragmatic approach for once and did some proper testing.
I had read over and over again that the trick to doing white tiles is correct focusing of the laser, one guide suggested firstly trying the focus on a piece of black card – the blue dot is easier to distinguish on black rather than white. But, the 40W is fixed focus, so all I needed was my little chunk of metal to set the distance, wasn’t it?

Using the Z-axis, I can move the laser into position.

But, was it perfect? Had I gone 0.1 mm too far perhaps or maybe even a bit short, time to try the black card.

Believe it or not, I had moved the laser up by 0.1, then 0.2, then down from its start position by 0.1, then 0.2, now my eyes are not perfect, but I can’t tell any difference at all...So, another method is required.
Another suggestion I’d read was to try on a coloured card, the stuff that’s coloured on one side, white on the other. There seems to be a distinct lack of this type of card in my local area and all I could find was gold. So, ignoring the fact that it was a bit shiny, I set about testing again.

I set what I expected to be the ideal focus point, then removed the metal chunk and was ready for LaserGRBL to work its magic.

I just needed a simple oblong, I used Line to Line.

I set the engraving speed to 800 mm/min, the S-MAX to 500 and my size to 10 x 15 mm. Then Create.

Since I was using card, I turned the power right the way down to 0.10 and the linear up to 2.0.
Each oblong took about 2 mins, so I won’t bore you with every step, but what I did was adjust my Z axis up by 0.1 mm each time.

And repeated the process for a full 1 mm upwards.
Then of course down.

This then gave me a set of 20 oblongs to look at.


It’s a bit easier to see on the less shiny gold, but the one in position 5 on the top row shall we say is a little sharper – 0.5 mm up to achieve that.
If this was what it was going to take to accurately focus the laser for tiles each time, my patience wasn’t going to stretch that far I’m afraid. For anyone with an adjustable laser, I’m sorry but you’ll have more patience than me I’m sure and with the black card and so on, I’m sure you will find a quicker process.

There had to be a simpler method and I had a flash of brilliance, or so I thought, perhaps I had read somewhere but I was going to try the same method you use with carving and setting the zero point. Use a piece of paper, under the metal (also saves scratching anything) and lower the z axis to the point where the paper can no longer be pulled free easily.

Re-run the oblong and check against what appeared clearest out of the 20 and what a surprise it was number 5………. So, it appears I’ve been pushing too far down on the metal trying to get my focus right, however now armed with my special piece of paper that won’t happen again.

Next up, try out on a tile. (About time, I can hear you).


Using the same oblong as previously, I adjusted the power to 0.5, left it on Line to Line and tried that first.
Then, Dither.

Vectorize and Fill.

Then, I tried the same 3 with the power set to 1.

The results were interesting:

Top Row
0.5 Power, Line to Line, Dithering, Vectorize
Bottom Row
1.0 Power, Line to Line, Dithering, Vectorize
Happiest with it on 1.0 for power, there was just one last thing I wanted to try, moving the axis up and down very slightly from what now I knew ought to be the perfect distance using my trusty piece of paper.


It is hard to tell on a photograph, but the centre shape is by far the clearest and sharpest, the start point with the piece of metal and paper! So, after all of that, to come back to where I should have started from anyway, oh well.
OK, now onto a picture, this is where it should get interesting.
Import your image into LaserGrbl:

Yes, I wimped out and went for a simple drawing rather than a photograph for my first attempts.
Adjust the Brightness, Contrast etc as required – I also turned off the B&W for my image.

As my tiles are 150 x 150 mm the ideal size for the image was 100 x 90.

I kept the same power & speed as previously.

And off it went.

Please forgive my slightly smug mode at this point, it looked great, but this was only half the process. I needed to clean the white paint back off the tile.
Back to the Isopronol,

Not quite so smug anymore, it looked grubby and patchy and a lot lighter, hmm, would need to re-examine the paint removing process.
But, since it was lighter, I thought I’d try a bit more power and went to 1.5 and got this result.

Clearer, darker and looks fabulous, but then to clean it.

Definitely looked better at higher power, but not getting the shiny tile effect I’ve seen everyone else getting. Re-check the cleaning process suggestions time, as all I’d done was wipe over the tile with the Isopropanol on a microfibre cloth.
Aha! I was sure I’d missed something vital, and I had, you need something to scrape the paint off with once the alcohol has softened it all. An old store card works well.

I found it took a couple of goes at the scraping process to get it all off and regain the shiny white tile effect.
But all in all, I’m quite happy with the final result. You can see from the glare it is now really shiny!

Is there anything the YoraHome CNC Carving & Laser Engraving Machine 3018-Pro cannot do?
Of course, you could do exactly the same process on the YoraHome 6550, especially if you’ve got yourself the YoraHome 6550 Z-axis to check the focus.
But, you could do projects so much bigger! Just think of those 300 x 200 mm tiles, oooh, I see a trip to the DIY store coming on again.
YoraHome can provide you with the machines. All you need is your imagination.
Join in the fun, you will be so happy you did.


Get The Freshest Content
Straight To Your Inbox
Join over 3,000 creators who receive premium content, exclusive discounts, and all the must-know info on a weekly basis.