


 LIMITED TIME
Last Sale Of The Year!
Up to 20% off at checkout on the YoraHome Store.
Grab All The Yoras You Want!
Carving Machines
15% off Yora 3018-Pro Machine
15% off Yora 3018-Pro Accessories
$100 off Yora SilverBack Machine
8% off Yora SilverBack Accessories
15% off Yora Router Bits
Laser Engravers
15% off Yora 6550 Machine
15% off Yora 6550 Accessories
15% off Yora Mini Laser Engraver
15% off Yora Draw
$200 off Yora CO2 Laser Engravers
$200 off Yora Fiber Laser Engravers
3D Printers
$10 off Yora Ender-3 V2
$30 off Yora CR-6 SE
$40 off Yora Ender-5 Pro
→Each printer comes with 3x Free bonus items
3D Filaments And Accessories
20% off Yora PLA Filaments
15% off Yora 3D Printers Accessories
1x Free Yora Filament Dryer For 1x 3D Printer + 5x PLA Filaments or 10x PLA Filaments
Woodworking Tools: 20% off
Home And Office Accessories: 20% off
Get Amazing Free Items With The Gorilla Bundles!
#1: 1x Free Yora 3018 Essential Bits For 1x Yora 3018 + 1x Yora 6550
#2: 1x Free Yora Rotate Module For 1x Yora 6550 + 1x Yora Draw
#3: 1x Free Yora Filament Dryer For 1x Yora 6550 + 1x 3D Printer
#4: 1x Free Yora TLC Rotary For 1x Yora 3018 + 1x Yora 6550 + 1x Yora Draw
#5: 1x Free Yora 6550 Z-Axis, Drag Chain, Air Assist and 3D Led Lamp For 1x Yora 3018 + 1x Yora 6550 + 1x Yora 3D Printer
Terms Apply
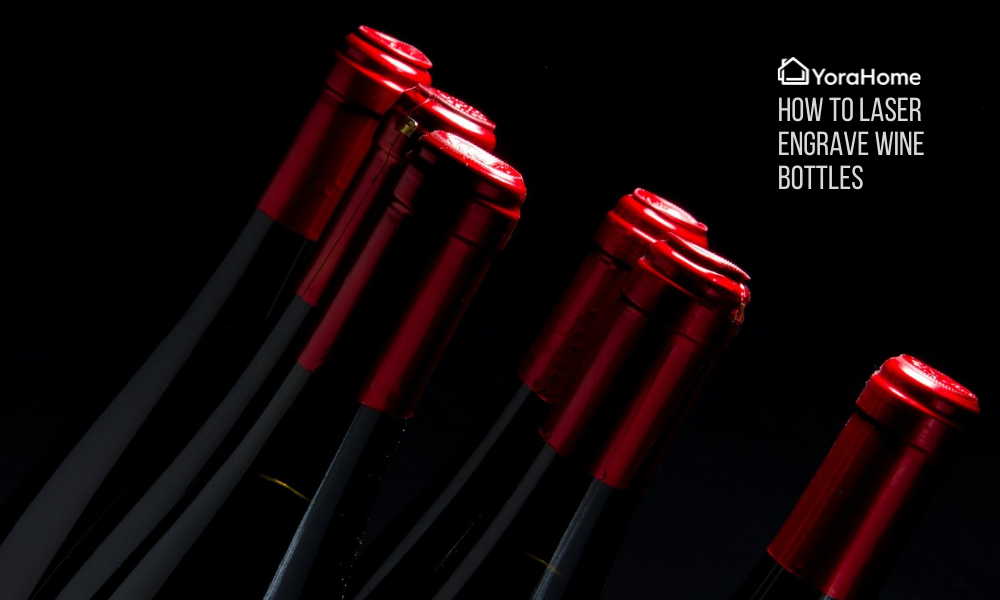
How To Laser Engrave Wine Bottles

Another new toy and a new challenge! I believe I’m reasonably competent at building the CNC machines now, but this Yora TLC Rotary Attachment stumped me, to begin with.
Well, the very first bit did!
The assembly instructions were my downfall, due to the crease in the paper the picture only appeared to show two 8 mm bolts going in, but it said 3, so I put the rest together and figured out which hole to put my extra bolt in – ha, not going to have a piece of kit defeat me.

Once built, it was time to defer to our resident guru on these matters, Tony Paolillo, and follow his video for how to set up the rotary in LightBurn. I won’t waste anyone’s time trying to explain it myself. Tony does such a brilliant job, watch the video below and replicate his steps.
Once all set up, doing straight up and down items like glasses with the same diameter top to bottom would be easy, but who wants to see me try easy? Wine bottle had to be the way to go. Not being drinkers, there isn’t a plentiful supply of wine bottles at our house, so the first bottle I tried was a Purdey’s bottle.
The thing about doing a bottle on the rotary is that you need the front end and rear end to move at the same rate. You have 2 wheels at the motor end driving it and two at the back following, think of a front-wheel drive car. Your bottle or cup etc. sits on both sets of wheels.

The TLC Rotary will account for the size difference front and back on something like a Yeti mug without any problem, you just push the slider bar towards the motor, making sure that the wheels that will be at the front and back are approximately equidistant in relation to where the centre of the cup will be. You can then adjust to make the item level with the height adjusters on the slider bar as well.

Wine bottles are a bit different….. (as are Purdey’s bottles) unfortunately you couldn’t lower the rear of the rotary on the slider bar adjustment far enough down to maintain the level of the bottle.
Because of the shape of a wine bottle, it is easier if you can make the whole object as if it’s the same circumference front and back.
To achieve this, firstly you need the diameter of the bottle, best way is to use your Yora 6 Inch Stainless Steel Digital Caliper.

Measure the base diameter and around the neck of the bottle where the “ridge” is.


Next, you want to cut a piece of plywood or acrylic or whatever you have available (thick stiff cardboard would work as well), and depending on its thickness you might need to cut 2 or 3 to make it thick enough, you want something around 6 / 7 mm thickness.
Opening Lightburn:

Use the draw an ellipse tool to generate your first circle adjusting the size to match your vernier reading for the diameter.

Then draw a second to the neck diameter.

Using the pointer tool select both circles and then click on the align centres button on the top ribbon.


Next click Arrange and Group to lock the concentric circles together.

Copy and paste as many as you will need to get the required thickness.
Select them all as before.

Go to Arrange, Distribute, Distribute H – Spaced.

Next , you need your cut settings, I used 3 mm plywood on a prototype Yora CO2 machine, so my settings wouldn’t probably apply to you. You could cut very thin balsa on a diode laser if you do a few passes, or using the Yora 3018 – carve the circles out, all else fails cardboard and scissors if you have a steady hand.

I discovered at this point that I could re-name the “Name” of the output (sorry if you all knew that, but it was new to me), so I called it Cut Line, very original I know.

Then move your group of circles to where you want on your workspace and press Start.

Hopefully, you will now have your circles cut out.

And ready to stick together.

Now you have your circles stuck ready to place them on the neck of the bottle – spot the mistake? If I’d made the centre circle slightly larger, it would have slid down the neck a little to reach where the neck itself is the same diameter as the ridge, but it wouldn’t make a difference on a short bottle. However, you might need the extra cm on a taller bottle.

Placing the bottle onto the rotary, you are aiming for a position where it almost but doesn’t quite touch the acrylic at front or rear, the bottle sits onto the bearing o rings at the front and rear and is level – slight overkill on the spirit level on my part but you get the idea.

The tensioning arm wheel should be sat on top of your cut circles.

The elastic bands are adjusted to keep the wheel in the right place.

Using the stepper motor, turn the shaft gently to check the bottle rotates as expected before you power it all up.

All that was needed now was an image to etch with my YoraHome CNC Laser Engraving Machine 6550 and the 40W Yora Laser Module.
So, I opened a small butterfly image, remembered to rotate it 90 degrees so it aligned correctly on the bottle.

I set the speed and power just to test and pressed Start.
Being the ever-patient soul that I am, I just wanted to see that it all worked in practice, so I stopped it after a bit to see how it looked.

You can definitely see the etching on the bottle, but this was a dark brown thick Purdey’s bottle. My aim was clear wine bottles!
Anyone who has tried to laser clear glass knows the issues, the beam goes straight through or just reflects back (damaging your laser). So, my favourite option for glass is to paint it with cheap black acrylic paint, like you buy for children from the supermarket.
I never was very good with a paintbrush, but here is the bottle painted all round as I hadn’t decided on my design at the point.

I measured the diameters as before, cut some plywood, and stuck my pieces together.

Having got all my adjustments made with the space cylinder, I could then, using the spacer ensure that my 40W laser would be focused.

Now to choose a design…
I’ve always loved the saying “Some people see weeds, others see wishes to be made”, so a dandelion it would be.
As with my other bottle, I had opened the image, rotated it pressed start and let the 6550 and the TLC Rotary do its thing.

Well, what do you think? Beautiful is the word that springs to mind – and it should be, it took ages!

Rookie mistake, I had opened the image in Lightburn and not made any adjustments, so it was doing a raster image from my original PNG, aaaarghhhhhh……
Lesson learned, I re-opened Lightburn and pressed Import to bring the same image in again.

Then go to Tools and click on Trace Image.

This opens the Trace Image box where you can adjust the image as needed, once happy click OK.

This has now changed the “Mode” to Fill & Line, but just for “fun” I further changed it to Line and adjusted the colour to blue, so it was easier to see.

I placed my newly painted bottle on the rotary and approximately 2.5 minutes later it was finished, hahahahaha, I won’t even bother showing you the result, needless to say it barely marked the glass.
More tinkering with settings, I changed it back to Line and Fill.

Rotated it through 90 degrees again.

And then clicked on Speed & Power to adjust again, to 400 mm/sec 90% power.

All I could find to try this time was a red coloured bottle, and I didn’t paint it – laziness mainly and set it up to try again.

WOW, WOW, WOW – gorgeous, side by side with the clear one that had taken hours and hours you can’t really see much difference in the image quality, but it was done in less than 20% of the time.

And just have a look at them with lights inside!


I think I know what everyone is getting as a Christmas present from me this year, we just need to start drinking wine to generate some bottles to use.
What I like best about the YoraHome machines are the innovations and opportunities that keep coming up with them.
If you are looking for a new way to use your Yora 6550, get the TLC Rotary and just imagine what you’ll be able to do!


Get The Freshest Content
Straight To Your Inbox
Join over 3,000 creators who receive premium content, exclusive discounts, and all the must-know info on a weekly basis.