


 LIMITED TIME
Last Sale Of The Year!
Up to 20% off at checkout on the YoraHome Store.
Grab All The Yoras You Want!
Carving Machines
15% off Yora 3018-Pro Machine
15% off Yora 3018-Pro Accessories
$100 off Yora SilverBack Machine
8% off Yora SilverBack Accessories
15% off Yora Router Bits
Laser Engravers
15% off Yora 6550 Machine
15% off Yora 6550 Accessories
15% off Yora Mini Laser Engraver
15% off Yora Draw
$200 off Yora CO2 Laser Engravers
$200 off Yora Fiber Laser Engravers
3D Printers
$10 off Yora Ender-3 V2
$30 off Yora CR-6 SE
$40 off Yora Ender-5 Pro
→Each printer comes with 3x Free bonus items
3D Filaments And Accessories
20% off Yora PLA Filaments
15% off Yora 3D Printers Accessories
1x Free Yora Filament Dryer For 1x 3D Printer + 5x PLA Filaments or 10x PLA Filaments
Woodworking Tools: 20% off
Home And Office Accessories: 20% off
Get Amazing Free Items With The Gorilla Bundles!
#1: 1x Free Yora 3018 Essential Bits For 1x Yora 3018 + 1x Yora 6550
#2: 1x Free Yora Rotate Module For 1x Yora 6550 + 1x Yora Draw
#3: 1x Free Yora Filament Dryer For 1x Yora 6550 + 1x 3D Printer
#4: 1x Free Yora TLC Rotary For 1x Yora 3018 + 1x Yora 6550 + 1x Yora Draw
#5: 1x Free Yora 6550 Z-Axis, Drag Chain, Air Assist and 3D Led Lamp For 1x Yora 3018 + 1x Yora 6550 + 1x Yora 3D Printer
Terms Apply
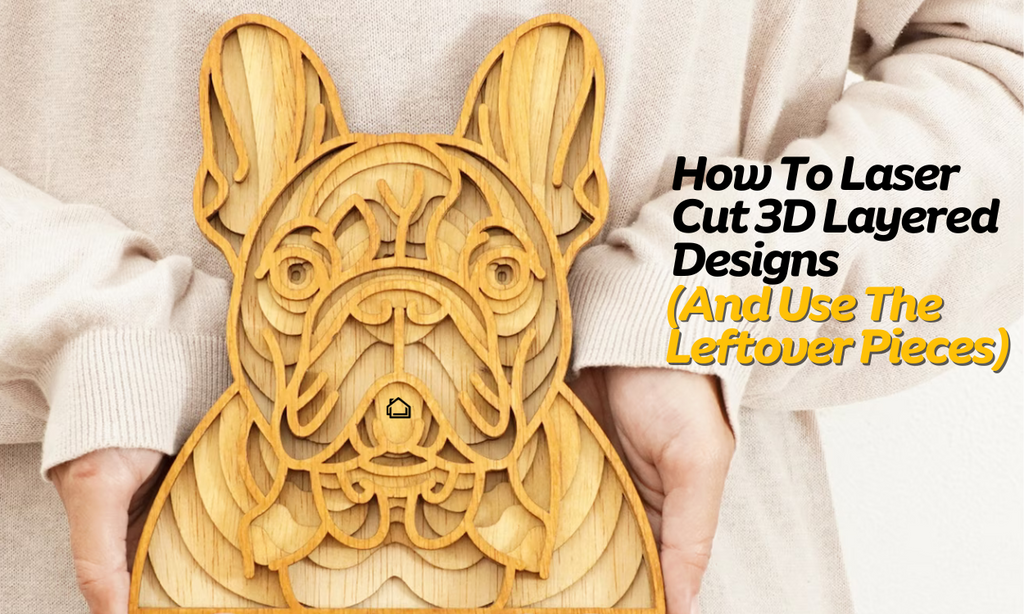
How To Laser Cut 3D Layered Designs (And Use The Leftover Pieces)

One of the things I have found with using my YoraHome machines is that I generate quite a lot of scrap.
It’s not just that I make mistakes and have to start again, most of the time, anyway. When that happens, a wood burner is handy.
But, it’s more that the size of the materials I use compared to the size of my projects don’t always match and tend to leave me with many pieces left over.
For example, one of my favorite things to do now is 3D layered designs, such as Dog Faces.
1. Where Can You Find 3D SVGs?
There are several on-line sites that sell 3D or Multi-layer SVGs as they are sometimes called. Etsy tends to be my go-to site.
Doing a search for 3D SVGs brought up a random selection.

Searching for Multi-Level SVGs brings up an even further choice.

But, there are many other sources, such as Creative Fabrica.

Even sites for Cricut and Silhouette cutting machines have 3D SVG sections available, such as Craft House SVG.

2. How To Use A 3D SVG?
I bought this package of SVGs from Etsy:

Having downloaded the zip file, I unzipped it.


I chose the one I wanted to use: the Old English Sheepdog.

Opening the SVG it came with 6 images.

I saved these images as a separate file.
I then opened Inkscape and then clicked Open to import the SVG.

The simplest way to deal with the images was to work on them simultaneously.
So, using Control A, it selected all six faces.

Then, clicking on Object on the top tool bar, Fill and Stroke, opened the Fill and Stroke Control Box.

Clicking on Stroke paint and clicking on the solid box opened the RGB (Red, Green, Blue) selection control.

On changing the Red number from 0 to 255, it places a red outline around the images.

Clicking on Fill, then the X removes all the filled areas of color.

At this point, I locked the dimensions and changed the measurement from px to mm.

Then, one by one, I selected an image, copied it (Control C), and placed it on a new page (Control V).

Locking the dimensions and changing the width to 200 mm increases the size of the image in proportion.

Clicking Edit, then Resize Page to Selection adjusts the size required for cutting.

The resized image needed to be saved and ready to use in Lightburn.

Each of the six images was adjusted and saved.
3. How Do You Cut Your SVG in LightBurn?
Open LightBurn and then the first image.

Knowing my wood was A4 size (approximately Letter Size), I wanted to use as much of it as possible, without getting too close to the edges.
So I adjusted the width of each image to 180 mm from 200mm.

The, I needed to set the Mode to Line. I clicked on Speed and Power to open the Cut Settings box, where I adjusted the settings to what I know works well with the plywood.I was going to use 300 mm/min at 85%.

Cutting the image from my material came out nicely.

But, there was a piece leftover – scrap.

Cutting the next 5 pieces generated even more scrap.
4. What To Do With The Leftover Pieces & Some Basic Economics
So, would it go in the “It’s too big to throw away, I’ll get round to using it pile”? The “Oooh, that’s big enough to use in the wood burner pile”? Or all too often, “Just chuck it away pile”?
Aha, no more!!! I realized I was not only increasing my carbon footprint hugely with either of the last two options (I’ve just been on a Carbon Literacy course with work), but I was throwing away an opportunity to make more money.
I have the 3D dog faces costed out using the six sheets of birch plywood for the large one, accounting for time, glue to stick it together, etc., and approximately 50% profit on top – I sell them for £25. But I’m left with six pieces of “scrap”.
It’s almost time to start taking Christmas decorations to Craft Fairs or getting them on my website, and I will easily fit some decorations on these pieces.
Remember, I’d been doing layered dog faces with 1.5 mm plywood, so it’s thin and easily breakable, so more 3D decorations would work well, and who says you can’t glue pieces together and double them up – oh yes, that’s what plywood is.

So, I cut the letters twice and made keyrings. Earrings are perfect using this thickness of ply.

I cut the rectangular keyrings double again and made them sturdier as well.

A quick count of extras:
- 3D Christmas Decoration £6.00
- Earrings £3.00
- 3 x Letter Keyrings @ £3.00
- Rectangular Keyring £3.00
- Total £21.00
I had only used up two and a bit of the six pieces, so if we were generous and doubled it, that’s an extra £42.00 for something I’d just put in a pile usually.
This list goes on as to what you can do with your leftovers, even with the little bits They have the potential to be transformed into fabulous jewelry and accessories, such as earrings, necklaces, and bracelets, crafting customized pendants and charms from laser project scraps, unique collages for wall decorations...
These are all made possible with your YoraHome machines. Every one of them is going to generate some scrap, from the 3.5W laser used on the “old” 3018-Pro (my first set-up and I still love it), to the 6550-Pro Laser Envgraver Cutter that I used for this project (you can use your 6550, Toocaa L2, or CO2 Laser cutter as well).

5. Conclusion
We can all help the planet by using the scrap pieces of wood, acrylic, paper, card, or whatever you have cut and got extra bits.
Use them, and if your first few “scrap” projects don’t turn out quite how you want them, Reuse, Recycle, Repurpose, as the mantra goes.
I probably make more money at craft fairs from the pieces I’ve made from the scrap bits than the intended items. Who cares? I’m still making money, and so can you!
Look at a recent stall and see how much came from scrap pieces.

And if you wondered how the sheepdog turned out.


Get The Freshest Content
Straight To Your Inbox
Join over 3,000 creators who receive premium content, exclusive discounts, and all the must-know info on a weekly basis.