


 LIMITED TIME
Last Sale Of The Year!
Up to 20% off at checkout on the YoraHome Store.
Grab All The Yoras You Want!
Carving Machines
15% off Yora 3018-Pro Machine
15% off Yora 3018-Pro Accessories
$100 off Yora SilverBack Machine
8% off Yora SilverBack Accessories
15% off Yora Router Bits
Laser Engravers
15% off Yora 6550 Machine
15% off Yora 6550 Accessories
15% off Yora Mini Laser Engraver
15% off Yora Draw
$200 off Yora CO2 Laser Engravers
$200 off Yora Fiber Laser Engravers
3D Printers
$10 off Yora Ender-3 V2
$30 off Yora CR-6 SE
$40 off Yora Ender-5 Pro
→Each printer comes with 3x Free bonus items
3D Filaments And Accessories
20% off Yora PLA Filaments
15% off Yora 3D Printers Accessories
1x Free Yora Filament Dryer For 1x 3D Printer + 5x PLA Filaments or 10x PLA Filaments
Woodworking Tools: 20% off
Home And Office Accessories: 20% off
Get Amazing Free Items With The Gorilla Bundles!
#1: 1x Free Yora 3018 Essential Bits For 1x Yora 3018 + 1x Yora 6550
#2: 1x Free Yora Rotate Module For 1x Yora 6550 + 1x Yora Draw
#3: 1x Free Yora Filament Dryer For 1x Yora 6550 + 1x 3D Printer
#4: 1x Free Yora TLC Rotary For 1x Yora 3018 + 1x Yora 6550 + 1x Yora Draw
#5: 1x Free Yora 6550 Z-Axis, Drag Chain, Air Assist and 3D Led Lamp For 1x Yora 3018 + 1x Yora 6550 + 1x Yora 3D Printer
Terms Apply
How To Laser Engrave Glass With A Diode Laser

Having previously tried laser engraving on glass with my 3018-Pro (With Laser Module Kit) and my 6550 Laser Engraver, it was time to try out the new 6550-Pro Laser Engraver.
Rather than make things complicated, this will be an absolute beginner’s version of laser engraving on glass with a diode laser. So don’t expect fancy or intricate, this will show you the basics and you can then use the principles and let your creativity run riot!
Laser engraving glass gives you an opportunity to try out different methods to achieve the frosted finish that you see other people accomplishing, as the issue with glass is that the laser beam either reflects off the glass or travels straight through it.
I’ll skip describing the disaster that occurred when I tried to laser directly on the glass, I’ll just show you.

As I said, I had engraved on glass with a 15W laser on the 6550 using vinyl and spray paint to create stencils and then using etching cream.
Both methods had worked but the process of generating the stencil then applying the etching cream, which is expensive and can be dangerous, as it will burn the skin if it comes in contact with it and the removing the vinyl or the spray paint make it rather more time-consuming and process intensive than my well-known degree of patience is comfortable with.


What do you need to engrave on glass?
Laser - Well, obviously you need a laser and you cannot do better than the 6550-Pro, this new version comes with a new and very powerful 80W diode laser module.
(There is also an 80W laser available for the original 6550 and the SilverBack; and shortly a version will be available for the Mandrill and the 3018-Pro).

Glass – This may sound perverse but cheaper glass appears to work better than expensive glass. I used glass from picture frames – make sure you are buying glass not acrylic as engraving acrylic is a whole different ball game.
Paint –
Option 1 - You can go to an art supplies store and buy tempera paint at great expense or go to the supermarket or discount store and get acrylic paint, sometimes referred to as school paint or poster paint.
Option 2 – Plasticote spray paint.
Paint Brush or Sponge – This is to apply an even layer of the acrylic paint.
Software – I used LightBurn for these tests, but I had used LaserGRBL on the previous ones, use whatever you are comfortable with.
Image – You need an image for testing, start simple.
How do you prepare glass for laser etching?
Clean the piece of glass with isopropanol alcohol or screen wipes – this is an opportune moment to give your laser lens a quick clean too.
Option 1 - Once dry, using your brush or sponge apply an even coat of acrylic paint all over one side of your piece of glass. For testing, I also coated both sides of another piece.
Option 2 – Repeat the above process with Plasticote paint.
How is laser engraving made on glass?
Open LightBurn (or your chosen software).

This is when you test the settings to see what works on your material with your machine. Draw a small square – I started with 30 mm x 30 mm.

Open the Cut Settings Editor from the Cuts Layers Tab on the right-hand side of the screen.

Using the piece painted on one side with acrylic, I started with 300 mm/min Speed at 50% Power on Fill, I then made the square smaller 15 mm x 15 mm and repeated at 500 mm/min at 30% then 300 at 15%. I then wiped off the paint with a damp cloth to see how these had engraved.

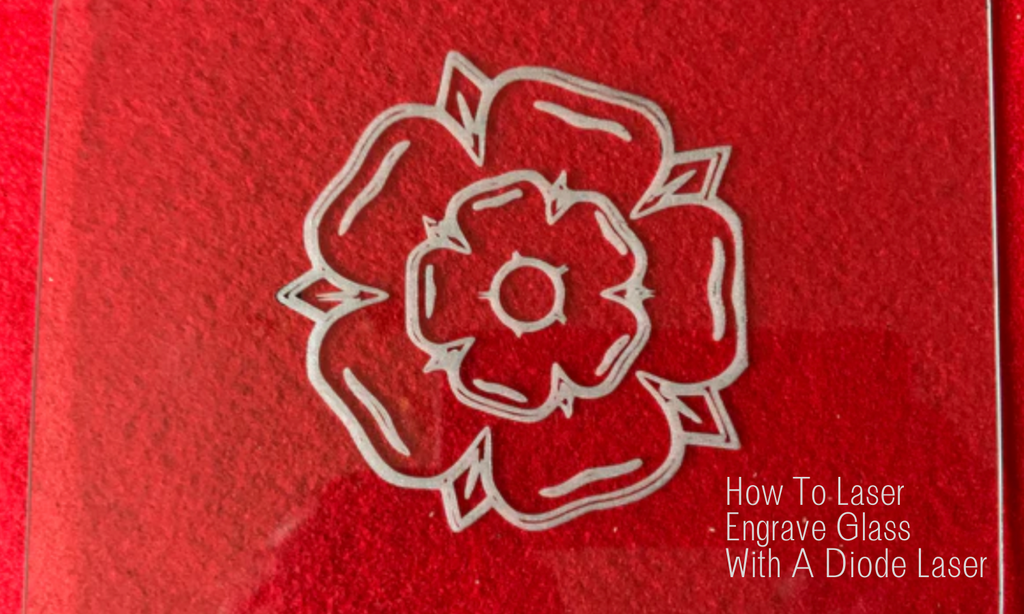
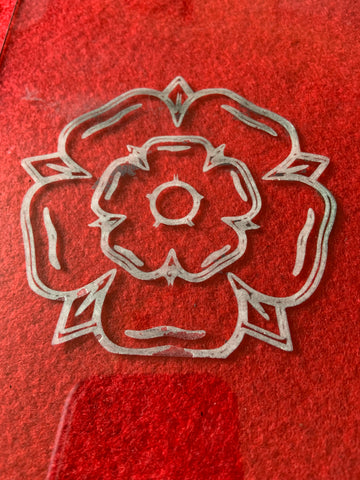
At this point, I tested the image I wanted to use. In Lightburn open the image you want to use, as a true born Yorkshire girl I chose the Yorkshire rose.

If your image opens as an image, go to Tools, Trace Image and this will convert it to a vector image. Then set the Mode to Fill. Set size of image.

Please note I put 4 small pieces of 2 mm birch under the edges of the glass to create a small gap. Set speed and power to 300 mm/min and 50%.
Reset speed and power 500 mm/min and 30%.
Reset speed and power 1500 mm/min and 85%.
When each of the tests finished, I could wash off the paint under running water to see exactly how the image looked.

By this point, I was happy with the testing and my final settings of 1500 mm/min and 85% (bottom center).
You may find that for your machine the settings need to be slightly different but keep trying till you get what you need.
Now, it's time to try the different pieces to see if they vary in quality.
Using the piece with acrylic paint on both sides, I increased the size of the image and ran the engrave. Once completed, I washed off both sides.


Using the piece with Plasticote on one side, I ran it again. This paint does not wash off and requires careful removal – I used a craft blade to scrape it off, be careful, these are very sharp!

All that was left was the piece with Plasticote on both sides. I’ll be honest, after the time it took to scrape off one side, I didn’t bother trying to scrape all of that off.

Conclusion
I can say hands down that acrylic paint and how it washes off so easily makes it the preferred option for ease of process and just have a look at how it came out, it’s fabulous!

With the choice of machines available from YoraHome, you are sure to find the one that meets your requirements and budget.
I love my 6550-Pro Laser Engraver, but I also love the Mandrill CNC Router and back to my first machine, the 3018-Pro CNC Router which will always be a favourite. All of which are useable with lasers and will allow you to try out glass engraving for yourself!


Get The Freshest Content
Straight To Your Inbox
Join over 3,000 creators who receive premium content, exclusive discounts, and all the must-know info on a weekly basis.