


 LIMITED TIME
Last Sale Of The Year!
Up to 20% off at checkout on the YoraHome Store.
Grab All The Yoras You Want!
Carving Machines
15% off Yora 3018-Pro Machine
15% off Yora 3018-Pro Accessories
$100 off Yora SilverBack Machine
8% off Yora SilverBack Accessories
15% off Yora Router Bits
Laser Engravers
15% off Yora 6550 Machine
15% off Yora 6550 Accessories
15% off Yora Mini Laser Engraver
15% off Yora Draw
$200 off Yora CO2 Laser Engravers
$200 off Yora Fiber Laser Engravers
3D Printers
$10 off Yora Ender-3 V2
$30 off Yora CR-6 SE
$40 off Yora Ender-5 Pro
→Each printer comes with 3x Free bonus items
3D Filaments And Accessories
20% off Yora PLA Filaments
15% off Yora 3D Printers Accessories
1x Free Yora Filament Dryer For 1x 3D Printer + 5x PLA Filaments or 10x PLA Filaments
Woodworking Tools: 20% off
Home And Office Accessories: 20% off
Get Amazing Free Items With The Gorilla Bundles!
#1: 1x Free Yora 3018 Essential Bits For 1x Yora 3018 + 1x Yora 6550
#2: 1x Free Yora Rotate Module For 1x Yora 6550 + 1x Yora Draw
#3: 1x Free Yora Filament Dryer For 1x Yora 6550 + 1x 3D Printer
#4: 1x Free Yora TLC Rotary For 1x Yora 3018 + 1x Yora 6550 + 1x Yora Draw
#5: 1x Free Yora 6550 Z-Axis, Drag Chain, Air Assist and 3D Led Lamp For 1x Yora 3018 + 1x Yora 6550 + 1x Yora 3D Printer
Terms Apply
What Can You Do With A Yora 5.5W Diode Laser?


Let’s just say that approximately 18 months ago I had no idea what I was getting into when I bought a Yora CNC Carving Machine 3018-Pro.

The plan was that my other half Shaun could do some carving and etching alongside his RC Car stuff. Well, that was the plan anyway, Shaun built the machine up while I was out at work and I arrived home to be “asked” to figure out how the software worked with the machine.
Hahaha, this was the last time Shaun got anywhere near the machine.
So, a great deal of fun and entertainment was had carving and etching different materials, but the lure of a laser got too much for me – I couldn’t resist and so I jumped in and got myself a 5.5W Yora Laser Module.

If you’ve read any of my blogs on cutting and etching with the diode lasers before, you will know that all I did to begin with was “wing it” with the settings and speeds. But, having taken the time to go through the 15W and 40W, I thought I ought to go back and do the same for the 5.5W.
And, I do understand that all you want to know is what settings you need to use to do “xyz”. Well, the list is at the end, but bear with me and you’ll find out exactly how to work out the needed settings for any material you want to use.
Referring back to previous blogs -
"The same as everyone else, I wish there was a list of settings I could find that would give me the exact details of what speed and power I need to use with all the different materials I can lay my hands on to produce that perfect finish – if anyone does find this elusive list, please, please, please let me know, it would save me a fortune in wasted materials.
But, until someone finds this list for me and believe me, I have scoured the internet looking for it, until then, I will have to stick to figuring it out each time and there are a few considerations that need taking into account as well. Every piece of wood is going to have its own variances, it’s a natural material, so even if it looks exactly the same as another piece, it may react to the laser slightly differently. Each type of timber will have a response all of its own, softwoods and hardwoods react differently too, it’s as if everything is conspiring to make the process difficult intentionally.
You want to know how your material will react when you start to laser it, before you start on any major project, to begin we just want to know what the material’s possibilities and / or limitations are".
My first attempts with the 5.5W involved starting with low power and turning it up, or running fast and slowing down, it was all a bit hit and miss to get the effect I wanted in the end, but it worked in the main, although it’s a good job we have a log burner at home, so wood is never wasted, it’s often just a bit charred in places before it gets properly burned.
This method of testing will work for each of the laser modules available from YoraHome, whether you have the 3W, 5.5W, 15W or 40w.
Being a LaserGRBL fan, I use that, but you could use the same type of grid in whatever software you choose to use. And I’ve done it in percentages so that anyone can use it with % power of their laser, (also as power is 0 to 2 in LaserGRBL settings, 2 = 100%, 1.5 = 75% and so on)
I suggest drawing up a simple grid, an outline of a square and a solid square ready for use – I like to make things simple, so I did mine in PowerPoint and saved each as a picture.

Starting with my simple grid on a piece of MDF, I showed how the varying of speed vs power changes the depth, colour and quality of the burn.
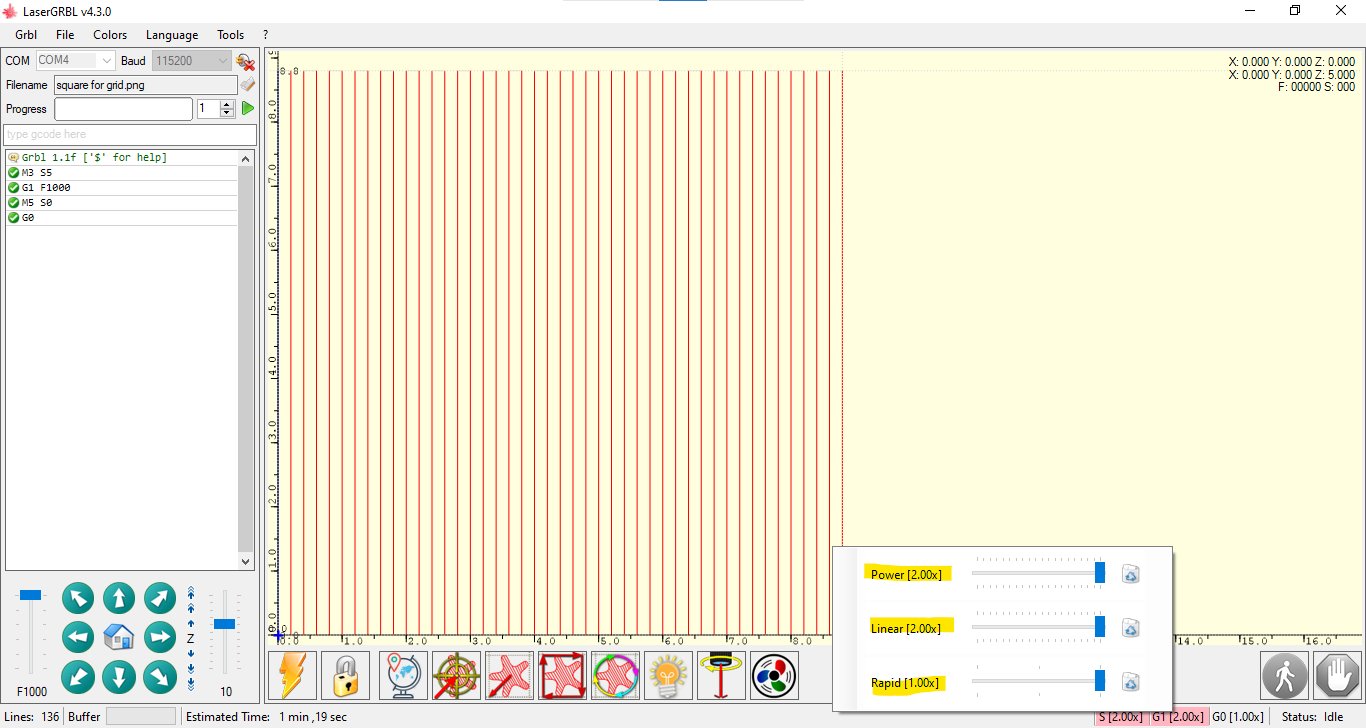
Opening LaserGRBL.

Open File and choose the grid.

Open the file.

Adjust the settings to Line to Line:
- Vertical
- 5 Lines/mm
- Engraving Speed 600 mm/min
- M4 Dynamic Power
- SMAX 1000
- 300 DPI
- Size 60 x 45

Adjust power and speed

Turn on the laser and adjust the focus – if you haven’t already downloaded the custom buttons, go to www.lasergrbl.com and get them – the icons make it so much easier to work out which shortcut does what.

Its not easy to tell whether or not the dot is getting sharper or not on mdf, so using a piece of black card makes it easier.

One of the best things about LaserGRBL is being able to adjust your settings “on the fly”, so when the grid was looking too pale, I adjusted the Linear Speed down to 1.0

Having completed the grid, then it was time to try each setting:
Import the solid square. Set your size so it will fit into the grid.

Using the Jog Controls, move the laser into position over the 100% Power 100% Speed square

and adjust the settings to
- Power 2
- Linear 2
- Rapid 1
On completing the square – move over to the next square on the grid 75% Power 100% Speed

- Power 1.5
- Linear 2
- Rapid 1

Then the third square over on the grid. 50% Power 100% Speed.

Power 1
Linear 2
Rapid 1

Then the fourth square over on the grid 25% Power 100% Speed

Power 0.5
Linear 2
Rapid 1

For the next row, repeat the process starting with the power at 75% and speed at 100%
Power 1.5
Linear 2
Rapid 1

Next, power at 75% speed 75%
Power 1.5
Linear 1.5
Rapid 1

Next, power at 50% speed 75%
Power 1
Linear 1.5
Rapid 1

Fourth, on second row
Power at 25% speed 75%
Power 0.5
Linear 1.5
Rapid 1

Yes, I know this is getting very dull and very repetitive and I can literally hear you rolling your eyes, so here is the chart of all the settings to use for the grid

So, how does this actually look once done?

Differences are not so obvious at this point, but once brushed off you can see very definitely that high power and slow speed will give the deepest darkest burn and low power high speed will be much lighter.

You could use this type of grid for any material to find the perfect setting, adjusting the settings further by changing your SMAX figure, the lines per mm, or engraving speed will further change things until you find exactly what you’re aiming for as far as colour and depth of burn goes.
But, what you want right now is a start point for various materials isn’t it?
This is how I worked out these settings, they won’t be perfect for every 5.5 w, as I said before they will give you a good start point but variations in materials will change requirements.
In LaserGRBL open the file with a square outline.

Set the size – don’t make it too big or it will take a long time for each test (I ended up with a 10 mm square). Also, think about the material you’re about to try, is it likely to catch on fire (such as paper)? Be careful with the power levels when using flammable materials.


So, start with low power and adjust as required. You will find that certain power levels will not even mark your material, you may need to up the power and lower the speed.
You can try a circle as well as a square to see if you get a better result.
After many trials on paper, I gave up, everything cut through the paper, if I’d taken the time to adjust my SMAX down as well I know I could have found the right setting, but I had a large number of materials to test.

Next, I tried white card.

This process does take a lot of time and effort, but it is worth it in the end.
This is what 2 days of testing materials looks like at my house.

But, you don’t care, all you want is the list, so here you are:

As I have kept saying, this is not a definitive list to work for every 5.5 w laser, these work for mine, on my set up, on what I “see” as being in focus – they will give you a start point to work up or down from at least.
Just look what you can actually do with the 5.5 w, look at the intricate detail, wow!

So, that’s marking/engraving, can you actually cut anything with the 5.5 Yora Laser Modules?
Using the same process to test, but with more power or slower speed, I found the following settings worked for me.

Just have a look at this beautiful Mandala style cross all cut with the 5.5, four layers of card.

Whether you choose one of the smaller Yora Laser Modules of 3 W or 5.5 W, or you go bigger and get the 15 W or go big or go home with the 40 W diode, you will find that they can all produce some amazing results.
Take your time to test for your required settings for whatever material you decide to use and have fun.
YoraHome has the machines and the choice of Laser Modules to let you explore your creativity and the backup to help and advise you to achieve whatever you’d like to do, whether it be making presents for friends and family or turning a hobby into a new side-line business. Join the YoraHome family, you’ll be glad you did.


Get The Freshest Content
Straight To Your Inbox
Join over 3,000 creators who receive premium content, exclusive discounts, and all the must-know info on a weekly basis.