


 LIMITED TIME
Last Sale Of The Year!
Up to 20% off at checkout on the YoraHome Store.
Grab All The Yoras You Want!
Carving Machines
15% off Yora 3018-Pro Machine
15% off Yora 3018-Pro Accessories
$100 off Yora SilverBack Machine
8% off Yora SilverBack Accessories
15% off Yora Router Bits
Laser Engravers
15% off Yora 6550 Machine
15% off Yora 6550 Accessories
15% off Yora Mini Laser Engraver
15% off Yora Draw
$200 off Yora CO2 Laser Engravers
$200 off Yora Fiber Laser Engravers
3D Printers
$10 off Yora Ender-3 V2
$30 off Yora CR-6 SE
$40 off Yora Ender-5 Pro
→Each printer comes with 3x Free bonus items
3D Filaments And Accessories
20% off Yora PLA Filaments
15% off Yora 3D Printers Accessories
1x Free Yora Filament Dryer For 1x 3D Printer + 5x PLA Filaments or 10x PLA Filaments
Woodworking Tools: 20% off
Home And Office Accessories: 20% off
Get Amazing Free Items With The Gorilla Bundles!
#1: 1x Free Yora 3018 Essential Bits For 1x Yora 3018 + 1x Yora 6550
#2: 1x Free Yora Rotate Module For 1x Yora 6550 + 1x Yora Draw
#3: 1x Free Yora Filament Dryer For 1x Yora 6550 + 1x 3D Printer
#4: 1x Free Yora TLC Rotary For 1x Yora 3018 + 1x Yora 6550 + 1x Yora Draw
#5: 1x Free Yora 6550 Z-Axis, Drag Chain, Air Assist and 3D Led Lamp For 1x Yora 3018 + 1x Yora 6550 + 1x Yora 3D Printer
Terms Apply
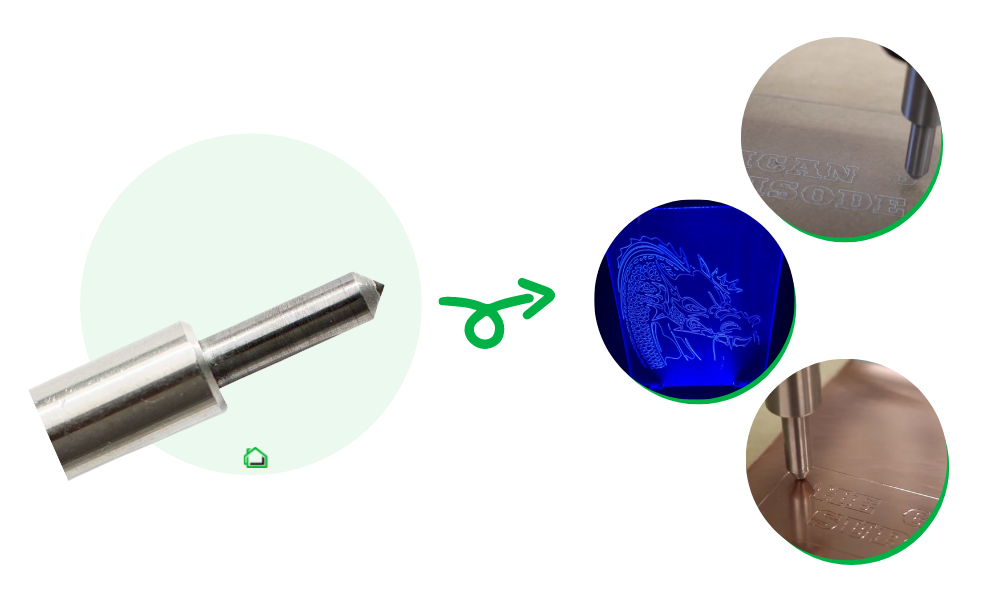
The Amazing Yora CNC Diamond Drag Engraving Bit!

I’m not sure if the expression – Best thing since sliced bread – is only used in the UK, but I can come up with a few more if needed. My new favourite thing in the world, move over V-Groove Bits, there is a new boss in town!
Please let me introduce the Yora CNC Diamond Drag Engraving Bit (90 Degree). 
OK, let me take a couple of steps back first.
I won’t say that etching acrylic is the Holy Grail of engraving or lasering, but an awful lot of time, money and materials have gone into people getting this right, I’ll admit to being one of the “smug” group who actually managed to get a decent result, but there is an answer that saves a whole heap of trouble and who knew it would be so simple!
Setting up the Yora 3018-Pro module to etch acrylic is really simple to get a spectacular result.
If you’re a Yora 6550 user, this could be the point that you decide to start carving as well! This is that good, I promise!!
So, what we are looking at here is the Diamond Bit.
To explain why it works so well, I’ll break it down. The bit itself looks a little different to your usual end mills. The diamond on the end of the bit will move through the material without requiring the usual spin. 
Internally is where part of the “magic” happens – the internal spring compresses as the bit moves across the surface – if there are any slight variations in material thickness, the spring will compensate for this, by allowing the sliding end to move in and out.

There are a couple of extra “special” things to note about this amazing bit as well – you run it without the spindle being on, yes, it’s quiet!!!!
And, and, and you run 1 pass – yes, you read that right, you can do the etch in 1 pass. You could do more, but you don’t need to.
Acrylic
So, here goes, the skinny on carving acrylic on the Yora 3018-Pro with the Yora Diamond Bit.
Not surprisingly for anyone who has read my blog pieces before, I used Easel.

Open a new Project.

Set up the material size and type.

Then set the bit size – the Diamond Bit has a 0.05 mm end, you can enter this as an “Other” bit (it will automatically go to 0.1 mm)

Then, import an image, using Image Trace.

Click Upload File.

Choose the file.

There is a bit of work to do on the image but click Open the file and then Upload.

This will open the file.

I converted my image using Invert and Trace Outline.
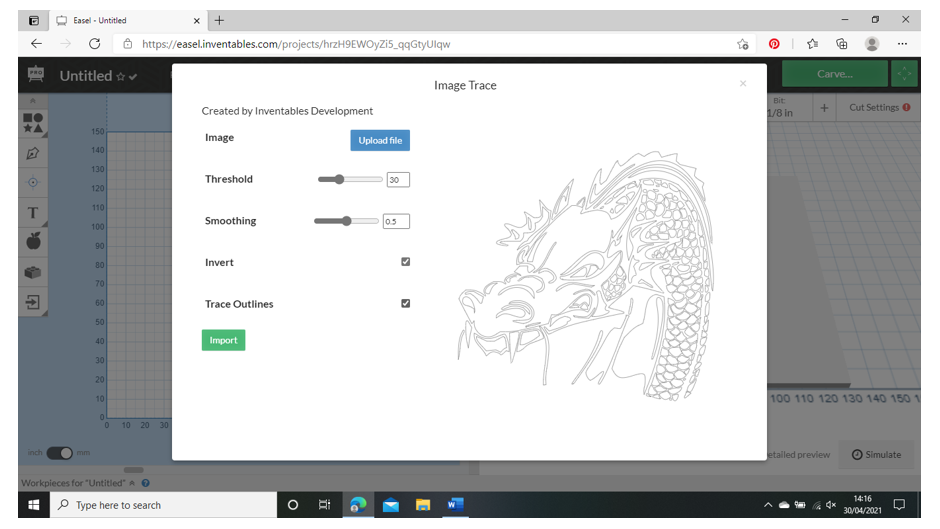
I then made slight adjustments on Threshold and put Smoothing to 1.

At this point, click Import. Before anything else, go to edit and Combine.


Then adjust the Cut Depth – I used 0.3 mm.

In the Shape tab, you can lock the proportions, adjust the size, etc. then using Edit, centre the image to the material.


Click on Cut Settings and go to Manual.

Feed Rate: 1000 mm/min
Plunge Rate: 400 mm/min
Depth per Pass :0.3 mm
Next, go to Machine and click Advanced.

Change the Default RPM to 0.

Then close that window.
You can remove the spindle wires from the control board and spindle as well
Next, press Simulate.

Yes, that really does say 20 mins.
So to get the machine set and ready, you need a larger collet than your standard one. The Yora CNC High Carbon Steel Extension Rod Collets (7 Pcs) includes the one you need (1/4") in its selection.

Then, using the usual bit of paper system to set the zero, adjust the Z axis to the point where the paper starts to “drag” as you try to pull it out – yes exactly as normal.

You might notice the acrylic I’m using is pre-cut to fit into a base – keep your eyes open in the YoraHome Shop for these becoming available to buy very soon.
Click Carve.

Confirm thickness.

Confirm Material is secure.

Confirm bit size.

Confirm work zero.
Almost Ready – Raise the bit.

Press the Turn on the spindle button.

Nothing will happen, then press Spindle is on button.

There here we go, Carve.

Using a very soft brush (Pound Shop / Dollar Store make up brush), you can brush off any dust generated as the carve goes on.

Just have a look at this!

And as if that didn’t look good enough, have a look at it lit up –


I really should have cleaned the acrylic before I took the photos, but I just couldn’t wait.
Surprise – the LED bases will also be available in the YoraHome Shop to buy very soon as well.
These look amazing, but I thought I’d try something a little more taxing and oh boy...

The image is so clean and sharp and so easy to do!
But, this is only the start with the Yora CNC Diamond Drag Engraving Bit (90 Degree), metals are now just as easy (and quiet) to engrave.
Brass

Copper

Stainless Steel

This new bit, the Yora Diamond Drag Engraving Bit (90 Degree) has just opened up a whole new set of opportunities with the Yora 3018-Pro including engraving jewelry, dog tags, metal business cards, pictures, glass...I cannot wait to try even more materials.
YoraHome keep bringing the best machines and accessories to the market. Join our community and get involved with making items for you and your friends and family or starting your own side-hustle.
You may even take this all the way to a new business – if you haven’t already joined in, today is the day!


Get The Freshest Content
Straight To Your Inbox
Join over 3,000 creators who receive premium content, exclusive discounts, and all the must-know info on a weekly basis.