Making Clocks From Your Old Vinyl Records

I wish I had artistic talent and a very steady hand, for years I’ve seen people convert their old vinyl records into gorgeous clocks and wall displays, but I’m afraid my art teacher was right when they wrote in my school report, “Janice tries very hard, but does not possess any artistic tendencies”.
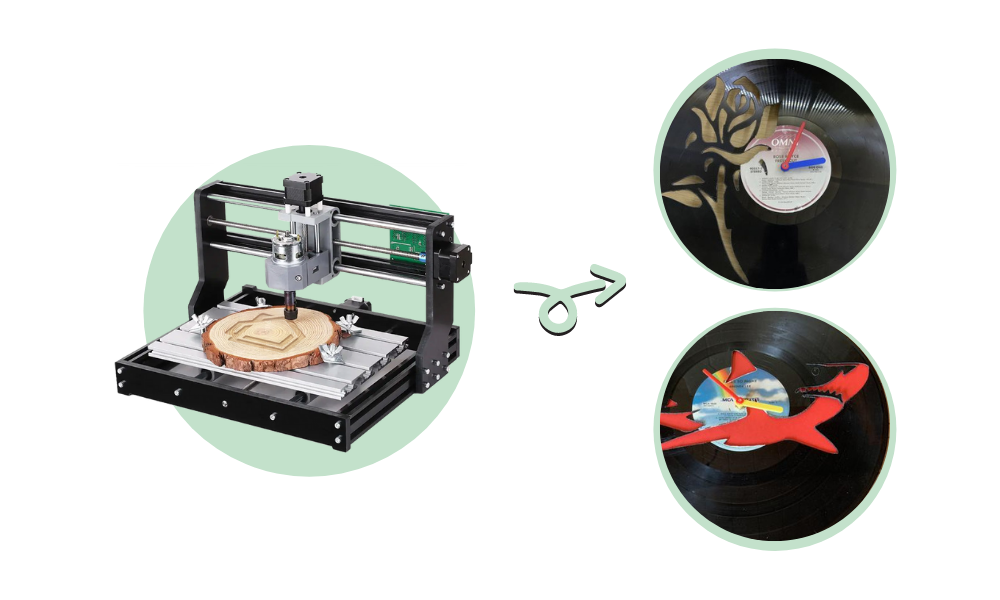
So the idea of being able to use my YoraHome CNC Carving Machine 3018-Pro to carve my ideas into old records seemed ideal.
Having added the YoraHome 3018 Expansion Kit to make my machine a huge Yora 3036,

means that albums and 12-inch records will easily fit.
So, all good to this point. Just the actual process and bits to sort out…….
Well, I’m not going to bore you with all the testing of different bits I did, needless to say, there were a lot of disasters, ruined end mills and a lot of old vinyl going in the rubbish.


I will however give you some pointers on actually making a success of this type of carve.
Choose your record – please don’t use any valuable vintage albums, there are plenty of scratched and damaged ones to be found at your local charity shops. Look at the labels too, what will make a good centre to the design you’re planning on.
I have read in lots of places that all you need to do is soak the record in soapy water to remove the labels, hmmm not any I’ve tried, from 10 minutes to overnight it didn’t work for me, but you can try, if you find a method that does work, please let me know!
Get some cardboard – the corrugated type works well. This will act as your base and spoil board if you go all the way through the vinyl. The corrugated type gives a bit of “spring” under the carve. Records, as some of us will remember, were not necessarily perfectly flat, some of us can even remember the free floppy plastic discs given away in comics, but I digress…
You need to find out the thickness of the record, depending on the era it may vary from 0.9 mm to 2 mm. This is where you need your Yora 6 Inch Stainless Steel Digital Caliper.

Measure the thickness in a few places around the edge, as I already noted it may not be perfectly flat.
Use double-sided tape on the rear of the record.

Attach the record to the cardboard, being aware of the orientation of the label to where the design will be.
As records are circular, your zero point will be off the edge, so you need to mark on the cardboard where the corner would be if it were square. A ruler and a set square allow accurate marks.

Affix the cardboard to the base of your machine.

I still love the adapters,

I made these for the clamps on my Creality Ender-3 V2 3D Printer, they just make fastening things down so easy.
Right, let's cut to the chase here and look at the steps needed.
In another life, I was a scuba diving instructor and have a love of sharks verging on obsession, so I chose a royalty-free shark design.

In Easel, open a New Project.

Set the material as cast acrylic and set the dimensions.

Next, choose the bit – the small engraving bits that come with the machine Yora CNC Shank Blue Coated Engraving Bits | V-Shape (10 Pcs) are an ideal choice.

They also come as part of the Yora Essential Bits kit if you need extras.

Enter the bit as an "End Mill"; Other 0.1 mm.

Go to Import then Image Trace.

Click Upload File.

Click Select Files to Upload.

This opens your files where you can choose your image.

Click Upload.

This opens your image to make any adjustments.

Adjust Threshold as needed, Smoothing to max and then Trace Outlines and then Import.

This puts your image on the workspace.

Go to Edit and Combine to convert the separate bits of image into one.

Go to the shape tab and make sure the padlock is closed to maintain proportions and set the size of the image.

Go back to Edit and click Center to Material.

Go to Cut Tab and set the Depth and Cut Path. My depth was 1.5 mm, from my measurement with the verniers and it needs to be Cut on Shape Path.

Go to Cut Settings and go to Manual.

Adjust the settings (yes, I know these are very different to suggested settings in the instruction manual, but this is an unusual material – please note, running at this speed does run the risk of breaking the bit more easily).
Feed Rate – 300 mm/min
Plunge Rate – 50 mm/min
Depth per Pass – 0.05 mm

Go to Machine and Click on Advanced.

Adjust the Default RPM to 300.

Then to set your zero point, jog to the position you marked on the cardboard, you can lower the bit to the exact point on the cardboard, then raise the bit to 20 mm or so, then jog to a position over the vinyl record, count how far up and across you move, now lower the z-axis on your piece of paper on top of the vinyl until you can feel a slight drag on it. Raise the axis 20 mm again and return to the zero point counting back to where you started, then lower 20 mm. The bit will not be touching the card now – if it is, re-do there’s something wrong!

Then click Carve and go through the usual steps.
This really, really makes a lot of mess, but we have the technology as they say, but first, this is how the carve came out

Little bits of roughness were rubbed off with a finger and the parts gently pushed out if they didn't fall out.
Next, you need a clock mechanism.

Aha, that would be totally visible behind the shark, so a bit of red card stuck to the rear and ta-daaah

But, not completely content just yet, I was just going to try one more new piece of equipment the new Yora 3018 Dust Shoe. This highly flexible and soft dust shoe attachment is a great way to suck dust or debris and it fits the 3018-Pro CNC routers with a 775 spindle.
First step, go to Machine and go through Set up your machine, clicking that the machine has a Dust Shoe.
Load new image into Easel, check the thickness of vinyl with Verniers, stick down record to cardboard, mark zero point, attach card and record to 3018 / 3036 bed, set zero point as previously, then lift z-axis up 30 mm, so that you can install the dust shoe.

Return z-axis 30 mm back down and go through the usual process, this time the instructions will ask about the Dust Shoe, click Attached and when you get as far as Carve, start the vacuum.
Wow, does this make a difference, not only does the vac pick up all the shavings, the reduction in mess is massive, but once it finishes, you will also notice fewer furry edges as well. The cuts are cleaner and sharper, and any little rough edges are easily smoothed with believe it or not – a toothbrush.
The final result:


Well, it was worth all the ruined and broken bits to get to this. When you try this, make sure you have plenty of vinyl to practice on and be ready to break a few bits before you get it completely right, but it’s worth it!
The Yora CNC Carving Machine 3018-Pro can be the start of a great adventure and so much joy, it might even be the start of a new side-line or a new business, many YoraHome customers start out with this machine and find themselves taken over by it. Join the YoraHome family today.
Get The Freshest Content
Straight To Your Inbox
Join over 3,000 creators who receive premium content, exclusive discounts, and all the must-know info on a weekly basis.


