


 LIMITED TIME
Last Sale Of The Year!
Up to 20% off at checkout on the YoraHome Store.
Grab All The Yoras You Want!
Carving Machines
15% off Yora 3018-Pro Machine
15% off Yora 3018-Pro Accessories
$100 off Yora SilverBack Machine
8% off Yora SilverBack Accessories
15% off Yora Router Bits
Laser Engravers
15% off Yora 6550 Machine
15% off Yora 6550 Accessories
15% off Yora Mini Laser Engraver
15% off Yora Draw
$200 off Yora CO2 Laser Engravers
$200 off Yora Fiber Laser Engravers
3D Printers
$10 off Yora Ender-3 V2
$30 off Yora CR-6 SE
$40 off Yora Ender-5 Pro
→Each printer comes with 3x Free bonus items
3D Filaments And Accessories
20% off Yora PLA Filaments
15% off Yora 3D Printers Accessories
1x Free Yora Filament Dryer For 1x 3D Printer + 5x PLA Filaments or 10x PLA Filaments
Woodworking Tools: 20% off
Home And Office Accessories: 20% off
Get Amazing Free Items With The Gorilla Bundles!
#1: 1x Free Yora 3018 Essential Bits For 1x Yora 3018 + 1x Yora 6550
#2: 1x Free Yora Rotate Module For 1x Yora 6550 + 1x Yora Draw
#3: 1x Free Yora Filament Dryer For 1x Yora 6550 + 1x 3D Printer
#4: 1x Free Yora TLC Rotary For 1x Yora 3018 + 1x Yora 6550 + 1x Yora Draw
#5: 1x Free Yora 6550 Z-Axis, Drag Chain, Air Assist and 3D Led Lamp For 1x Yora 3018 + 1x Yora 6550 + 1x Yora 3D Printer
Terms Apply
Wood Staining: Using Things From Your Cupboards

It’s almost summer!!!
Some areas may be looking forward to glorious weather and time spent outside and in gardens, here in the UK we might get a few good days.
You will have to leave the house and meet people again, you can tell them what you've been making with your YoraHome machines.
A lot of people have used their time during the pandemic to build themselves a garden bar, an outdoor jacuzzi, summer house, shed, man-cave, she-cave etc.
This leaves them in the market for some personalized signage. Time to break out your Yora and make them some signs ready for summer!
I am, as you will have realized if you have read any of my blogs before, completely spoiled and have a choice of machines at my disposal. I love, love, love my YoraHome CNC Carving & Laser Engraving Machine 3018-Pro. And now it has the YoraHome Expansion Kit available (and fitted to mine), the workspace has doubled for both the router or laser.
But, for even bigger pieces I can pull out the Yora CNC Laser Engraving Machine 6550 with a choice of Laser Module from 3.5 W to 40 W.

Having decided which machines to use, it then comes down to the choice of materials.
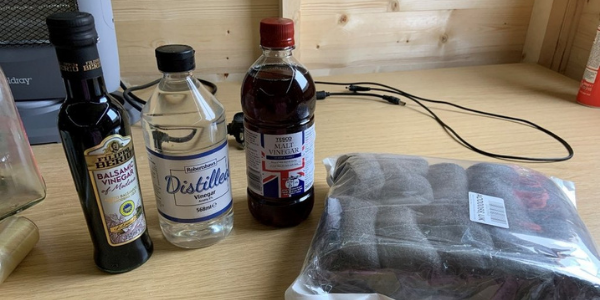
For most garden style signs, people tend to go for wood, but new freshly planed wood doesn’t look quite right. I’ve seen people using bicarbonate of soda and water to increase the darkness of a burn and this does tint the wood a little grey. Others have used steel wool in white vinegar to make their own stain. This seemed like a challenge I couldn’t wait to try.
I wanted to try a couple of options on wood first, just to get an idea of the effect I could get, so I got some birch ply, some wood slices and some pine strips. I’d also seen that using tea or coffee would also affect colouration, so I gathered some supplies including different types of vinegar.

I placed a small handful of steel wool in a coffee jar and poured in the white/distilled vinegar, I wasn’t exactly expecting a huge chemical reaction, but basically nothing happens, you just need to leave it for a while.

Turns out a while should be a few days, patience aaargghhhh.
I then made-up further batches, first with Malt Vinegar, for the non-British, it’s the brown vinegar us Brits use on Fish and Chips. But, being short of jars to begin with, I used cups and covered them with cling film (saran wrap).

Balsamic vinegar was next.

Just for a bit of something different to steel wool, I found some rusty screws, springs and nails and added white/distilled vinegar.

I also left some (3) tea bags in water overnight along with some filter coffee. I then needed to find something else to do for a few days for the other mixes while they all did their thing.
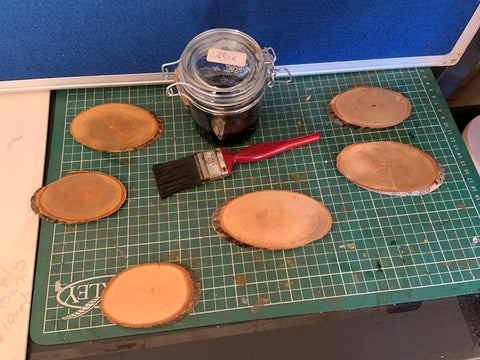
Once a few tortuous days of waiting had passed, I used coffee filter papers to filter the mixes and laid out the pieces in 2 batches. One side I painted with the tea mixture, the other got coffee. And yes, my painting technique is very messy, so I won’t show all the pieces I did.

Even with just one coat of tea or coffee there was a distinct change. But, this then needed to dry again before the next step.

The large piece of ply had:
- Left Hand Side: Tea x 1 & Steel Wool and White Vinegar x 1
- Right Hand Side: Coffee x 1 & Steel Wool and White Vinegar x 1
The small pieces from top to bottom:
Left Hand Side
- Tea x 1 & Steel Wool and White Vinegar x 1
- Tea x 1 & Steel Wool and Malt Vinegar x 1
- Tea x 1 & Rusty Nails and White Vinegar x 1
- Tea x 1 & Steel Wool and Balsamic Vinegar x 1
Right Hand Side
- Coffee x 1 & Steel Wool and White Vinegar x 1
- Coffee x 1 & Steel Wool and Malt Vinegar x 1
- Coffee x 1 & Rusty Nails and White Vinegar x 1
- Coffee x 1 & Steel Wool and Balsamic Vinegar x 1
This was starting to get interesting and was making me think this would make sign making a lot more fun.
So, real wood next – some slices of silver birch were tried out next.

Thinking better this time, I did 5 slices with Tea and then left one without any.
Then coffee.
I also laid out my pieces of pine and gave the 3 pieces a coat of tea.

Once dried, the pine got a second coat on the second piece and a second and third on the third piece.

Getting a bit carried away with myself I coated the wood slices as follows:
- Tea x 1 & Steel Wool and White Vinegar x 3
- Tea x 1 & Steel Wool and Malt Vinegar x 3
- Tea x 1 & Rusty Nails and White Vinegar x 3
- Tea x 1 & Steel Wool and Balsamic Vinegar x 3
- Tea x 1 Plain no coating
And wow!
Have a look at the result:

And Coffee:

- Coffee x 1 & Steel Wool and White Vinegar x 3
- Coffee x 1 & Steel Wool and Malt Vinegar x 3
- Coffee x 1 & Rusty Nails and White Vinegar x 3
- Coffee x 1 & Steel Wool and Balsamic Vinegar x 3
- Coffee x 1 Plain no coating
Hmmmm, some of those came out a bit dark, hahahaha.
So, I turned over the slices and just used the vinegar mixes.
- Steel Wool and White Vinegar x 2
- Steel Wool and Malt Vinegar x 2
- Rusty Nails and White Vinegar x 2
- Steel Wool and Balsamic Vinegar x 2
- Plain no coating

These colours will be much more useable!
So how about the pine strips as that’s probably what I’ll need to use for garden signs?

I gave each of the pieces 2 coats of Rusty Nails and White Vinegar mix, on top of their Tea bases, I really like the aged appearance achieved on the bottom one, that’s going to make some fabulous Tiki Bar signs!
YoraHome machines will give you, your friends and family so much pleasure from what you produce, whether you choose the YoraHome 3018-Pro to carve with or go with a laser or the YoraHome 6550-Pro. The thing you can be sure of is that their customer service and back up will make you happy you chose to buy from them.


Get The Freshest Content
Straight To Your Inbox
Join over 3,000 creators who receive premium content, exclusive discounts, and all the must-know info on a weekly basis.