All You Need To Know About The Burn Settings of The Yora Diode Lasers

Having had such a nice reaction to my article on cutting settings with the Yora Laser Modules, I thought I’d resurrect and complete something I’d started writing a few months ago on burn settings.
If you want to cut to the chase and just read the list, it’s at the end. But, believe me, you will have missed the most important bits. Stick with it and you will learn something that will prove useful, I promise.
One of the things I like best about my Yora CNC Laser Engraving Machine 6550 is that I can use it on so many different materials. From wood to slate, glass to anodized aluminium, paper to acrylic, nothing in my house is safe these days. And like everyone else, I wish there was a list of settings I could find that would give me the exact details of what speed and power I need to use with all the different materials I can lay my hands on to produce that perfect finish – if anyone does find this elusive list, please, please, please let me know, it would save me a fortune in wasted materials.
But, until someone finds this list for me and believe me, I have scoured the internet looking for it, until then, I will have to stick to figuring it out each time and there are a few considerations that need taking into account as well. Every piece of wood is going to have its own variances, so even if it looks exactly the same as another piece, it may react to the laser slightly differently. Each type of timber will have a response all of its own, softwoods and hardwoods react differently too, it’s as if everything is conspiring to make the process difficult intentionally.
You want to know how your material will react when you start to laser it, before you start on any major project. Choosing images is another whole area that also requires a deeper understanding. So to begin, we just want to know what the material’s possibilities and/or limitations are.
I will be honest and admit that I spent a couple of months just jumping in and starting up the laser and “winging it”, start with low power and turning it up, or running fast and slowing down. It’s all been a bit hit and miss to get the effect I wanted in the end. But, it has worked in the main, as you can see below, although it’s a good job we have a log burner at home so wood is never wasted. It’s often just a bit charred in places before it gets properly burned.

I have now come to the conclusion that I will make my own list and keep proper records of what works and what doesn’t – yes it’s a great idea and I tell everyone to do that, but now I have a proper plan of how I will achieve this in a methodical manner and with my newly acquired index card system I will definitely do it.
This method will work for each of the laser diodes available from YoraHome, whether you have the 3W, 5.5W or the 15W, or even the CO2 lasers with one of the big beasts (Yora 40W, 50W or 60W).
Each material I try out now, I’m going to do a grid and check how it responds to varying Power & Speed settings. I’m going to use an extremely basic grid as below. Being a LaserGRBL fan, I’ll be using that, but you could use the same type of grid in whatever software you choose to use. And I’ve done it in percentages so that anyone can use it with % power of their laser, (also as power is 0 to 2 in LaserGRBL settings, 2 = 100%, 1.5 = 75% and so on).

You can use the grid above as the basis to do your own tests (it is a PNG):
- Import the image into LaserGRBL and set the dimensions. The grid wants to be 5 x 5 squares plus the line to the side for % Speed and the line to the top for % Power.
- For this grid, I am using 60 x 60 mm.
- I’m using MDF, so my settings for the grid are: Power - S 2.0, Linear – G1 2.0, Rapid – G0 1.0


- Once the grid has burned and returned to home position,

- Open a new file, and import the image below. This needs to be 10 x 10 mm.

- Place the 10 x 10 mm square on the grid at the 100% Power and 100% Speed position - on screen this will be at position x 20 y 30 and set the Power & Speed: S 2.0 G1 2.0 G0 1.0

PLEASE NOTE: Think about the material you’re about to burn. Is it likely to catch fire, such as paper? If so, don’t use full power on it and definitely do not use full power at a slow speed unless you’re going to sit with a fire extinguisher in your hands.
- Press start and the square will appear on your grid

- Next move the square to x 30 y 30, 75% Power, 100% Speed, S 1.5 G1 2.0 G0 1.0. Press start and the square will appear on your grid.
- Next move the square to x 40 y 30, 50% Power, 100% Speed, S 1.0 G1 2.0 G0 1.0 Press start and the square will appear on your grid.
- Next move the square to x 50 y 30, 25% Speed, 100% Power, S 0.5 G1 2.0 G0 1.0. Press start and the square will appear on your grid.
- Just follow the steps above for 75%, 50% & 25% Power. You can check that your squares will be in the right place by using the frame function in LaserGRBL. (Set up your shortcuts or download the file from LaserGRBL)
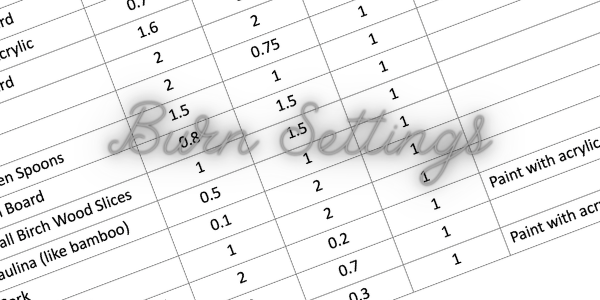
I know this is starting to get tedious, so I’ll just show a chart with the rest of the numbers in:

This was the result:

The grid shows very graphically that high power and slow speed will burn dark and deep, high power and high speed not so much – you have to think that the laser moving quickly has less time to burn an area before it moves on (high speed with low power didn’t even mark & I tried it 3 times to be sure).
So, for MDF I can now pick what effect will work best for my project. It depends on personal choice as to whether you prefer the black-ish burn or more of the brown-ish. If you want a sepia type finish, go for one of the brown settings, if its black for you (& me), go with the black.
Now, even I am a bit bored by all of this, it’s not exactly rock n roll, but it will make the next MDF project I start much better and much less likely to end up as firewood.
From now on, I just need to repeat the grid each time I go to try a new material. If I’m going to be using an expensive material, I might extend the grid to include more options, perhaps 10% increments, or try it with varying my S-Max values. There are lots of little tweaks that can be made.
OK, you’ve earned it, if you’ve made it this far, here is my very basic burn settings list. Again, no promises, but these work for me and my machine. Using these settings on a 15W laser, depending on what I’m trying to engrave, I start with:
- Line to Line
- Direction – Horizontal
- Quality 6,000 lines/mm
- Engraving Speed - 300 mm/min
- Smax = 1000 (to match GRBL $30 setting) unless otherwise stated on the list:

These YoraHome Laser Engraving machines have so much to offer and allow such creativity, it’s a shame there aren’t more hours in the day to try out more stuff.
You could surprise yourself and your friends and family with a so far undiscovered artistic talent and become the "go-to" person for personalized presents. Many successful businesses have been started by people buying the 2-in-1 Yora 3018 or the Yora 6550. You could be the next one!
Get The Freshest Content
Straight To Your Inbox
Join over 3,000 creators who receive premium content, exclusive discounts, and all the must-know info on a weekly basis.


