


 LIMITED TIME
Last Sale Of The Year!
Up to 20% off at checkout on the YoraHome Store.
Grab All The Yoras You Want!
Carving Machines
15% off Yora 3018-Pro Machine
15% off Yora 3018-Pro Accessories
$100 off Yora SilverBack Machine
8% off Yora SilverBack Accessories
15% off Yora Router Bits
Laser Engravers
15% off Yora 6550 Machine
15% off Yora 6550 Accessories
15% off Yora Mini Laser Engraver
15% off Yora Draw
$200 off Yora CO2 Laser Engravers
$200 off Yora Fiber Laser Engravers
3D Printers
$10 off Yora Ender-3 V2
$30 off Yora CR-6 SE
$40 off Yora Ender-5 Pro
→Each printer comes with 3x Free bonus items
3D Filaments And Accessories
20% off Yora PLA Filaments
15% off Yora 3D Printers Accessories
1x Free Yora Filament Dryer For 1x 3D Printer + 5x PLA Filaments or 10x PLA Filaments
Woodworking Tools: 20% off
Home And Office Accessories: 20% off
Get Amazing Free Items With The Gorilla Bundles!
#1: 1x Free Yora 3018 Essential Bits For 1x Yora 3018 + 1x Yora 6550
#2: 1x Free Yora Rotate Module For 1x Yora 6550 + 1x Yora Draw
#3: 1x Free Yora Filament Dryer For 1x Yora 6550 + 1x 3D Printer
#4: 1x Free Yora TLC Rotary For 1x Yora 3018 + 1x Yora 6550 + 1x Yora Draw
#5: 1x Free Yora 6550 Z-Axis, Drag Chain, Air Assist and 3D Led Lamp For 1x Yora 3018 + 1x Yora 6550 + 1x Yora 3D Printer
Terms Apply
How Good is The YoraHome 3018-Pro 300W/500W Spindle Upgrade Kit (Inlay Carving)

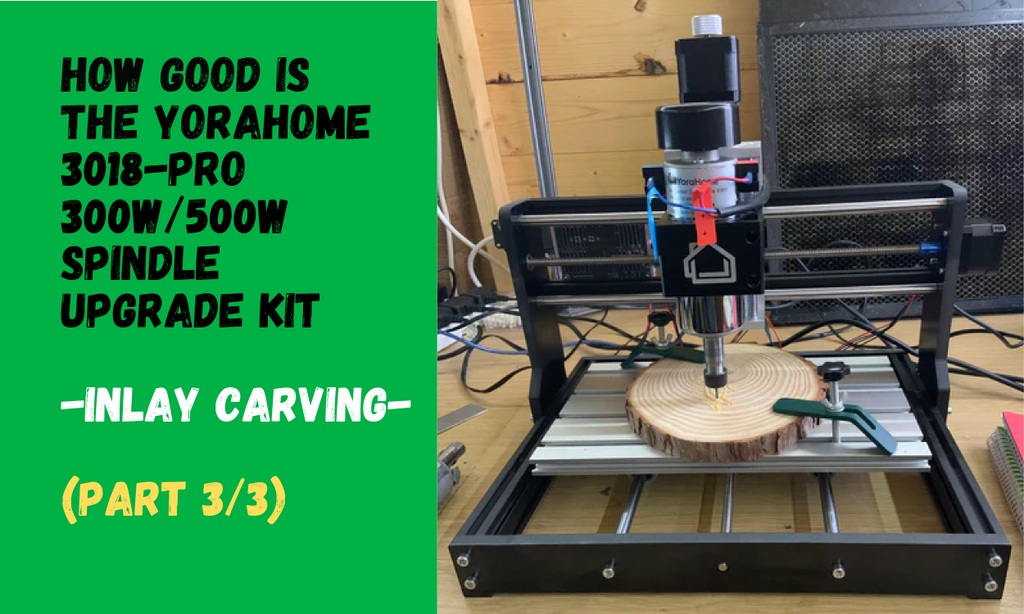
When I said at the end of my last blog that I thought I’d fallen back in love with carving, I should have said I’d fallen back in love with carving with the YoraHome CNC Router 3018-Pro, especially with the upgraded spindle!

This neat little machine with its 30 x 18 cm work bed doesn’t take up too much room and it is more than capable of doing the majority of what I want to achieve, there’s no getting away from it, I love this machine.
Having shown that the 3018-Pro CNC was able to compete with the bigger machines on 3D carving, there was one more thing I wanted to try with the spindle upgrade. And that was doing an Inlay.
What is Inlay Carving/ The Inlay Technique?
One of the most impressive things I see done with carving machines is Inlay Carving, where two or more pieces of material are combined too make one “flat” surface piece, that’s the simplest way I think I can explain it.
Or you could explain it as inserting or setting into a shallow or hollowed out surface a material of a different colour or type. Imagine the tourist jewellery box pieces with mother of pearl inlay. Hahahaha, that’s a bit further advanced than I’m doing here, but you get the idea.

Is it difficult to do an Inlay Carve?
Well, I’ve watched lots of YouTube videos and in-between the “umms and errs” and “Oh I didn’t mean to do that” and “I’ll just change that back”, on how to do it, I found it got a bit hard to follow, so here is my simple explanation of how to do your own Inlay carve.
What software do you need to be able to do Inlay Carving?
Anyone who has read any of my previous blogs will know I am a huge fan of Easel.
I do use Easel Pro I admit, and I believe it’s worth it for me. The free trial will show you whether or not you want to use the additional features available, but even the free version is brilliant.
Easel has the perfect options available for this type of carving!
How do you do your first Inlay Carve?
Firstly, open Easel.
 Click on New Project.

This opens the New Project workspace.

Set the material type and size for the “background” material.

Click on Shapes.

Choose Square.

Click to insert the square.

Adjust the size and position of the square.

Choose Circle in Shapes.

Repeat the steps and adjust size and position as previously.

Click Edit and Select All.

Click on Apps.

This opens the App Library – don’t let yourself get too distracted here, there are so many apps available in Easel to use, come back later to see what else you can do!

Click on Inlay Generator.

This shows the cut out and the pocket parts and the standard bit size and tolerance. I left these as they were.

This then shows all the parts, with cut outs, pockets and original shapes.

There are a number of ways to complete this bit, but the easy way for me – click on the full thickness shapes.

Move the shapes up.

Click on the lower pockets and delete.

This leaves the full thickness cut outs and the original shape pockets.

Click on the + sign in the Workpieces area to add extra pieces

Go back to the first workpiece, then Edit and Select All.

Edit and Copy.

Paste into the second and third workpiece.

Go back to the second workpiece and delete the cut out pieces, leaving the pockets.

Use a caliper to check the thickness of the inlay material.

Adjust the pocket depth to the inlay thickness.

Click on Cut Settings and adjust in Manual Settings.

Go to third workpiece and delete the pockets.

Change material type and adjust size and thickness for inlay material.

Go to Edit and Center the shapes to the material.

You can adjust the size and number of tabs on the cut outs, or move them around your shapes so they don’t interfere with corners or anything else.

Go to Cut Settings, Manual and adjust.

Attach “background” material to machine work bed.
Click Carve, and follow usual steps, set zero point.

Click Carve and let the 3018-Pro do its magic!

On completing the pockets.

A quick vacuum will improve how it looks, and a gentle sanding will remove the rough edges.

Attach the inlay material to a spoil board.

Cut the full thickness parts.

Remove the parts ready to insert.

Insert the parts into the background.

Well ok, not exactly tra-daaa at this point, but the general idea is there.
So, a few minor adjustments were needed at this point, hahaha, rookie mistake number 1 – I used the wrong type of bit, so I changed to using some of the YoraHome CNC Titanium Coated Router Bits (10 Pcs).

It should be noted that all the advice you read on doing inlays tells you that you must use the same bit on both the background and the inlay.
To achieve fine details as we know, you need to use the smallest bit you can, hmmmm, that would mean cutting out the pocket would take a massive amount of time if you use that bit – my famous amount of patience meant I had to find another way.
How do you improve on your Inlay Carves?
Open a new project.

Set material and size and thickness for the background material.

Click on Pro Design Library.

Choose Design Library – Animals

I chose the horse head – select the cut type as Fill.

Adjust the size and position.

Click Apps.

Open App Library and click Inlay Generator.

This opens the Inlay Generator.

Knowing that there was some finer details to be cut, I adjusted the bit size to 1/32 inch and reduced the tolerance to 0.001 then click Import.

In workpieces, click on the down arrow on the first and duplicate twice. Yes that's easier than cutting and pasting.


Go to the second workpiece and delete the full thickness and extra pocket, retaining the original shape and adjust the depth to the inlay material thickness.

Set Bit size, this will be to take out the majority of the pocket.

Add a Detail Bit, this will cut the fine details around the edge of the pocket – I used 0.8 mm.

Go to next workpiece and remove all except the full thickness cut out and delete detail bit by clicking on the x.

Change the material, size and thickness to the inlay material.

Move the object to where you want it on the material.

I had attached my inlay material with double-sided tape to the spoil board, so I removed the tabs.

Click on Bit and change to 0.8 mm.

Click Cut Setting, Manual and set.

Go back to workpiece 2 and check cut settings, bit sizes etc.

Click Carve to open the set up process.

Follow the steps and choose Roughing Pass.

Continue through the steps, setting zero point etc. until you reach Almost Ready to Cut. Click Raise the Spindle, then turn on the spindle via the Control Box.

Confirm that the spindle is on, then click Carve.

Set ready for Roughing Pass.

On completing roughing, change bits, click Carve repeating the process and choose Detail Pass and Continue.

Confirm both bits are correct.

Almost ready to cut, raise the bit and turn on the spindle again and confirm Spindle is on.

Click Carve.

Cutting the detail pass.

Once completed the roughing pass, the pocket is ready for the insert.

Attach the inlay material to a spoil board and attach to the work bed. Using the 0.8 mm bit cut out the inlay.

Once completed, remove the inlay piece

A gentle sanding of the background material and around the edges of the inlay will assist in placing the parts together.
You can use wood glue and clamps to insert the piece into place, but with the tight tolerance I used, it took a bit of persuasion to go in, so it didn’t need any glue.
And I’m happy to say Tra-daaaa now!

Conclusion
Inlay Carving takes some practice, as with other projects.
It’s a good idea to test everything first. Ensure that the tolerance you set is right, that your measurements are absolutely correct for the inlay depth and when you are ready to put the pieces in place, a gentle sanding will remove any loose edges.
The CNC Router 3018-Pro with the Spindle Upgrade Kit is an amazing package that is capable of so much, I am sure I will continue to find more and more projects to do with it.
YoraHome can offer you many different machines from the neat little 3018-Pro CNC to the Mandrill 3036 CNC and the massive SilverBack Benchtop CNC.
Whatever the size of your CNC dreams, from carving to laser engraving, YoraHome can offer you it all.


Get The Freshest Content
Straight To Your Inbox
Join over 3,000 creators who receive premium content, exclusive discounts, and all the must-know info on a weekly basis.