


 LIMITED TIME
Last Sale Of The Year!
Up to 20% off at checkout on the YoraHome Store.
Grab All The Yoras You Want!
Carving Machines
15% off Yora 3018-Pro Machine
15% off Yora 3018-Pro Accessories
$100 off Yora SilverBack Machine
8% off Yora SilverBack Accessories
15% off Yora Router Bits
Laser Engravers
15% off Yora 6550 Machine
15% off Yora 6550 Accessories
15% off Yora Mini Laser Engraver
15% off Yora Draw
$200 off Yora CO2 Laser Engravers
$200 off Yora Fiber Laser Engravers
3D Printers
$10 off Yora Ender-3 V2
$30 off Yora CR-6 SE
$40 off Yora Ender-5 Pro
→Each printer comes with 3x Free bonus items
3D Filaments And Accessories
20% off Yora PLA Filaments
15% off Yora 3D Printers Accessories
1x Free Yora Filament Dryer For 1x 3D Printer + 5x PLA Filaments or 10x PLA Filaments
Woodworking Tools: 20% off
Home And Office Accessories: 20% off
Get Amazing Free Items With The Gorilla Bundles!
#1: 1x Free Yora 3018 Essential Bits For 1x Yora 3018 + 1x Yora 6550
#2: 1x Free Yora Rotate Module For 1x Yora 6550 + 1x Yora Draw
#3: 1x Free Yora Filament Dryer For 1x Yora 6550 + 1x 3D Printer
#4: 1x Free Yora TLC Rotary For 1x Yora 3018 + 1x Yora 6550 + 1x Yora Draw
#5: 1x Free Yora 6550 Z-Axis, Drag Chain, Air Assist and 3D Led Lamp For 1x Yora 3018 + 1x Yora 6550 + 1x Yora 3D Printer
Terms Apply
25 Top Tips For Lasering And Engraving

From not knowing what a CNC machine was, over the past 18 months or so, I have gained experience and a reasonable amount of knowledge through using my YoraHome machines, and have written a number of blog pieces with various guides and tips on how to get the best from your machines.
So, here you will find my 25 top tips for lasering and engraving.
I am spoiled, I have a YoraHome CNC Carving & Laser Engraving Machine 3018-Pro which is fabulous. And, with the YoraHome 3018 Expansion Kit, this now has a working area of 30 x 36 cm.

I’ve got a Creality Ender-3 V2 3D Printer (I did say I was spoiled).

But, my “Go-To” machine is my YoraHome CNC Laser Engraving Machine 6550. This little beauty has a working area of 65 x 50 cm, plenty big enough for most projects. If you need bigger, the option of the YoraHome 6550 Expansion Kit takes the workspace up to a massive 65 x 100 cm.

You’re reading this for some tips, not to find out about all of my toys, so here goes:
1. Set up your machine properly
YoraHome provides a fantastic assembly video to make setting up your own Yora 6550, along with a build manual, a breeze!

2. Safety, first
Should go without saying really, but ensure you use laser protective glasses to safeguard your eyesight when using the laser.
The YoraHome Blue-Violet Laser Protective Glasses 200-540nm that come with the lasers are designed specifically for this use. You can get additional pairs for friends and family to be able to watch you work your magic! There’s even a Laser Shield available that offers additional protection to filter out the light produced by the YoraHome adjustable and focused lasers modules. 
3. Ventilation
Use your laser in a well-ventilated area. Some stuff smells really bad when you burn it – leather for example is what can only be described as rank when burning. An open door and a fan will do the job normally. And always check that what you plan to laser is safe to use!

4. Check your focus
Adjustable Focus Lasers – For the adjustable 3.5W and 5.5W lasers, a distance of approximately 1-3/4” (45mm) from the lens to the workpiece is generally recommended. You can then fine-tune to the smallest dot possible – you will find this simpler if you use a piece of black card, the dot is easier to distinguish.
Fixed Focus Lasers – For the focused 15W and 40W lasers, a distance of approximately 20 mm from the lens to the workpiece is generally recommended. YoraHome makes this easy by providing an aluminium spacer to put between the workpiece and the lens, so you can adjust to the correct distance.

5. A quick note on focus
To make lines appear thicker on a burn, just slightly de-focus the laser.

6. Preparing wood for use
Ensure the wood is flat. Bowed pieces will put some parts closer to the laser and increase burning, where others may hardly burn. Sand the wood to get a nice smooth surface. There are various mixtures you can use on wood to change the colour of the burn; vinegar and steel wool are extremely popular to darken a burn.

Check out the blog post Wood Staining: Using Things From Your Cupboards.
7. Preparing slate for use
Wipe the slate with a damp cloth and allow to dry. Spray with matt clear varnish and allow to dry.

Check out the blog post What You Need To Know About Laser Engraving On Slate.
8. Preparing glass for use
Paint the rear of the glass with water-based poster paint. It washes off easily.

Check out the blog post How To Successfully Laser Engrave On Glass.
9. Preparing acrylic for use
Mask the top surface of the acrylic with painter’s tape, sticky back paper, or something similar. It gets rid of the reflection you would get if trying to laser directly and also stop it from traveling straight through (the same as paint on glass).

10. Preparing ceramic tiles for use
Clean tiles with isopropyl alcohol and wipe them over by using a micro-fibre cloth. Lightly spray with white paint and leave to completely dry. Once lasered, use something to “scrape” off the paint once it has been soaked in isopropyl alcohol.

Check out the blog post How To Laser Engrave On Tiles.
11. Preparing canvas for use
Using the white acrylic spray paint, spray an even coat over the entire canvas. Allow to completely dry (12-24hrs).

Check out the blog post How To Laser Engrave Canvas With LaserGrbl.
12. Always try out your settings on a scrap piece first
It's much better than ruining the full piece! Hahaha, get a log burner then there is no evidence. This month's box of scrap :)

13. Wood grain
Wood is one of the favourite materials to use with a laser. However, the wood grain that makes it so attractive comes from winter and summer growth and will tend to burn differently. Try to burn diagonal to the grain to avoid tiger stripe patterning.

Picture shows from top to bottom: Horizontal Lines, Vertical Lines and Diagonal Lines
14. Coasters trick
When doing multiple objects such as square coasters, to reduce waste, you want to place the squares, side by side, with no gap – this creates a double line on the adjoining part – you will not see it, but your computer and your machine will.
This would mean cutting it twice and possibly burning the material. Easy solution, remove one of the lines, so it only cuts once.

15. Cool down your laser
Lasers should be allowed cool down periods when working for extended stints. In LaserGrbl, you can set a cool down phase in Settings, so you do not forget.

16. Power and Speed settings
The simplest way to look at power and speed whatever power laser you are using is as follows:
Power Setting
- Higher power burns deeper, too much power = loss of detail – no effect on running time
- Lower power burns shallower, too little power = loss of detail – no effect on running time
Speed Setting
- Higher speed saves time – burns shallower and reduces detail
- Lower speed increases time – burns deeper but too deep can reduce detail

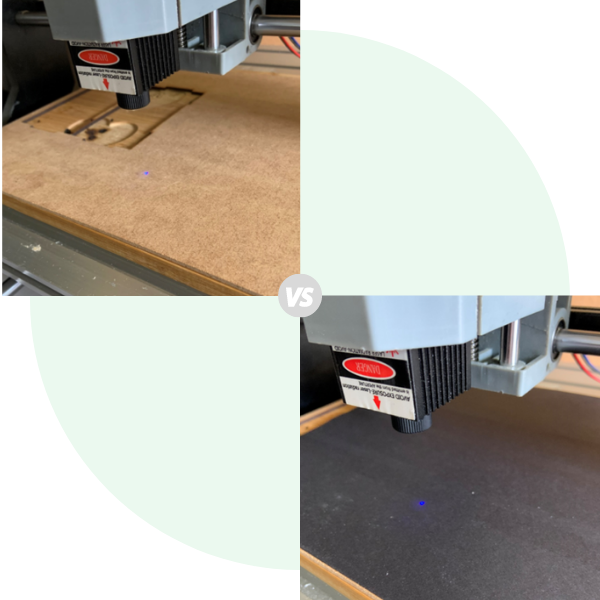
17. When burns are coming out charred
Reduce the power or quicken the speed.

Picture shows : 50% of original power & 25% of original power
18. Clean your burns
Cleaning the workpiece after burning can vary on timber from gently going over with a vacuum to lift any soot, brush with a soft paint brush, wash off under running water or some people swear by rubbing over with baby wipes.

Picture shows after cleaning with vacuum, paint brush & baby wipes
19. Maintain your machine
Take care of your machine with the YoraHome 6550 and YoraHome 3018 Maintenance Kits.

20. Clean your laser lens
Clean the lens on a regular basis using lens cleaner on a cotton bud or spectacle wipes – let it dry completely before using it again!

21. Update your software when new versions come out
I tend to use LaserGRBL which as of August 2021 is on version v4.4.1, but many people use LightBurn which is on version 1.1.1. 
22. Use the LaserGrbl shortcuts
LaserGRBL has a set of pre-defined custom buttons available to download straight into the program. These include a framing tool, centering, on/off at low power for focusing, and so on. 
23. Join the YoraHome CNC Users Group
When you purchase a YoraHome CNC machine, you will be invited to join the private Facebook group YoraHome CNC Users Group. This is where the real fun and learning happen.

24. YoraHome has an EXCELLENT technical support
If you need further assistance with your YoraHome machine, you can send an email to support@yorahome.com, provide them with your order number, details of your machine, the software you are using and what the problem you have. Their technical support team is composed of past customers who know exactly the pain or frustration new CNC users may have by using these machines, which makes their support really effective.

25. Practice, Practice, Practice
There is no better advice, the more you try the more you learn! Remember to enjoy it as well, don't get frustrated it takes most of us a bit of time to get to grips with these things, but when we do, wow, the things we achieve!

So, a year and a half down the line and I have learned a lot, but every day is a school day and I continue to learn every time I turn on the machines.
I am so glad I chose to get my first machine from YoraHome, with their support and encouragement I have not looked back, and now like many other of their customers run a quite successful side-line business. You could be next! Join the YoraHome family and enjoy your creativity.


Get The Freshest Content
Straight To Your Inbox
Join over 3,000 creators who receive premium content, exclusive discounts, and all the must-know info on a weekly basis.